
Cisco Unified Communications Manager Express Cheatsheet CUCME CME Tutorial Guide
Video Links:
How To Setup 2 Phones on a Single CME Router and get the GUI going.
How to use Dialpeers with CME with two routers
How to implement call restrictions using COR / Class of Restriction
Set your clock:
HH:MM:SS
clock set 22:00:00 24 September 2024
timezone:
You put the correct timezone such as PST and the offset eg. -7 hours in our example.
clock timezone PST -7
If you want ntp (recommended in production):
Remember to add a working gateway for internet or this won't work:
In this example 192.168.122.1 is our gateway IP (change to yours)
ip route 0.0.0.0 0.0.0.0 192.168.122.1
Router(config)#ip name-server 208.67.222.222 8.8.8.8

Router(config)#ip domain-lookup

Router(config)#ntp server time.nist.gov
Translating "time.nist.gov"...domain server (208.67.222.222) [OK]
ntp worked:
Router(config)#do show clock

15:09:42.031 PST Tue Sep 24 2024
Getting started, let's enable ephones and DNs we can add a phone with a telephone number:
telephony-service is the heart of CME and how we access it.
Some important things to understand first is that a DN stands for "Directory Number". It's really just a number that gets assigned to a phone.
Router>en

Router#conf t

Router(config)#telephony-service
!this enables ephone registration otherwise phones cannot register
Router(config-telephony)#ephone-reg
!max-ephones 2 says we can have a maximum of 2 phones, change to your needs (or to the limit set by your IOS image)
Router(config-telephony)#max-ephones 2
!set the maximum amount of DNs (phone numbers) eg. 20 numbers (adjust as needed)
max-dn 20
!set the source address of the voice traffic which should be our router's IP address
Router(config-telephony)#ip source-address 192.168.5.1 port 2000
!let's include the following message on the phone for the user: change YourName VOIP to whatever you would like them to see such as your organization name etc..
Router(config-telephony)#system message YourName VOIP
!this creates the conf files
Router(config-telephony)#create cnf-files
Post-init cnf creation is in progress, pls re-issue this command later
! set your clock before creating cnf-files
Router(config-telephony)#
CNF-FILES: Clock is not set or synchronized, retaining old versionStamps
CNF files update complete (post init)
#!continue on even if you get an error and then do a wr and reboot the router if in doubt (it usually still creates the config)
!this below should happen if your CME and phone are setup right. Take the SEP out of and use it as the MAC address later
*Sep 29 21:57:13.467: %IPPHONE-6-REGISTER_NEW: ephone-1:SEP525400123456 IP:192.168.1.199 Socket:1 DeviceType:Phone has registered.
!this creates our first telephone number (the 1 stands for the ID, not the number)
Router(config)#ephone-dn 1
!now we set the actual phone number or extension
Router(config-ephone-dn)#number 7871
!now we set a name that it shows on the phone and is also visible to people they call
Router(config-ephone-dn)#name Firstname Lastname
!now we create our first phone ID #1
Router(config-telephony)#ephone 1
!now we map our first button on the phone screen to ephone-dn 1 (actual number 7871) from earlier
Router(config-ephone)#button 1:1
!we will get the error below if we don't add the mac-address first
Need to configure ephone mac address or VM station-id
! add the mac address like below before you can map the button. Mapping the MAC address is actually assigning the phone to ephone ID #1
#change the mac-address below to the MAC of the phone you are trying to add
r2(config)#ephone 1
Router(config-ephone)#mac-address 5254.0012.3456
Restart a Cisco IP Phone Remotely:
r2(config)#ephone 1

r2(config-ephone)#restart

restarting 5254.0012.3456
figure out which phone number is assigned to which phone:
Router#show ephone telephone-number 7871

DP tag: 0, primary

Tag 1, Normal or Intercom dn

  ephone 1, mac-address 5254.0012.3456, line 1
show summary of all ephones:
Router#show ephone summary
hairpin_block:
ephone-1[0] Mac:5254.0012.3456 TCP socket:[1] activeLine:0 whisperLine:0 REGISTERED
mediaActive:0 whisper_mediaActive:0 startMedia:0 offhook:0 ringing:0 reset:0 reset_sent:0 debug:0 primary_dn: 1*
IP:192.168.5.6 CIPC keepalive 1006 music 0 1:1
Max 2, Registered 1, Unregistered 0, Deceased 0 High Water Mark 3, Sockets 1
ephone_send_packet process switched 0
Max Conferences 4 with 0 active (4 allowed)
Skinny Music On Hold Status
Active MOH clients 0 (max 600), Media Clients 0, B-ACD Clients 0
No MOH file loaded
show registered ephones:
Router#show ephone registered
ephone-1[0] Mac:5254.0012.3456 TCP socket:[1] activeLine:0 whisperLine:0 REGISTERED in SCCP ver 20/12 max_streams=5
mediaActive:0 whisper_mediaActive:0 startMedia:0 offhook:0 ringing:0 reset:0 reset_sent:0 paging 0 debug:0 caps:11
IP:192.168.5.6 50786 CIPC keepalive 1005 max_line 8 available_line 8
button 1: dn 1 number 7871 CH1 IDLE
Preferred Codec: g711ulaw
show phones that tried to register (but probably couldn't for some reason):
show ephone attempted-registrations
show what phone a DN ID number is assigned to (in this case we use 1)
Router#show ephone dn 1

Tag 1, Normal or Intercom dn

  ephone 1, mac-address 5254.0012.3456, line 1
How To Check Your CME Version Command:
show telephony-service
Voice Routing
show our dialpeer information/routing:
Router#show dial-peer voice summary
dial-peer hunt 0
AD PRE PASS OUT
TAG TYPE MIN OPER PREFIX DEST-PATTERN FER THRU SESS-TARGET STAT PORT
20001 pots up down 0 50/0/2
20002 pots up up 7871$ 0 50/0/1
show detailed information about a dialpeer (eg. TAG 20002):
Router#show dial-peer voice 20002
VoiceEncapPeer20002
peer type = voice, system default peer = FALSE, information type = voice,
description = `',
tag = 20002, destination-pattern = `',
voice reg type = 0, corresponding tag = 0,
allow watch = FALSE
answer-address = `', preference=0,
CLID Restriction = None
CLID Network Number = `'
CLID Second Number sent
CLID Override RDNIS = disabled,
rtp-ssrc mux = system
source carrier-id = `', target carrier-id = `',
source trunk-group-label = `', target trunk-group-label = `',
numbering Type = `unknown'
group = 20002, Admin state is up, Operation state is down,
incoming called-number = `', connections/maximum = 0/unlimited,
DTMF Relay = disabled,
URI classes:
Destination =
huntstop = enabled,
in bound application associated: 'DEFAULT'
out bound application associated: ''
dnis-map =
permission :both
incoming COR list:maximum capability
outgoing COR list:minimum requirement
Translation profile (Incoming):
Translation profile (Outgoing):
incoming call blocking:
translation-profile = `'
disconnect-cause = `no-service'
advertise 0x40 capacity_update_timer 25 addrFamily 4 oldAddrFamily 4
mailbox selection policy: none
type = pots, prefix = `',
forward-digits 0
session-target = `', voice-port = `50/0/2',
direct-inward-dial = disabled,
digit_strip = enabled,
register E.164 number with H323 GK and/or SIP Registrar = TRUE
fax rate = system, payload size = 20 bytes
supported-language = ''
dial tone generation after remote onhook = enabled
mobility=0, snr=, snr_noan=, snr_delay=0, snr_timeout=0
Time elapsed since last clearing of voice call statistics never
Connect Time = 0, Charged Units = 0,
Successful Calls = 0, Failed Calls = 0, Incomplete Calls = 0
Accepted Calls = 0, Refused Calls = 0,
Last Disconnect Cause is "",
Last Disconnect Text is "",
Last Setup Time = 0.
Last Disconnect Time = 0.
enable dialpeer debugging:
Router#debug voip dialpeer
voip dialpeer default debugging is on
How To Create A VOIP dial-peer:
dial-peers are what definite voice reachability or how we are able to reach a number that we call.
dial-peers must be created in both directions, so in our example below you'll see that we setup opposite dial-peers on each router.
The below creates a dialpeer tag "7861" of type VOIP (IP-based and not analog port based)
It sets the destination pattern of 7861 (it means that for when we dial 7861 on the phone) it will be sent to a dial peer on IP 192.168.5.1
r2(config)#dial-peer voice 7861 voip

r2(config-dial-peer)#destination-pattern 7861

r2(config-dial-peer)#session target ipv4:192.168.5.1
dialpeers are two ways, so for calls to be successful between the parties, let's say we have another phone 7871 on router r2 192.168.5.99. How can it reach back to 7861 if we don't tell it?
This shows us how to reach 7871 by 192.168.5.99
r1(config)#dial-peer voice 7871 voip

r1(config-dial-peer)#destination-pattern 7871

r1(config-dial-peer)#session target ipv4:192.168.5.99
COR Class of Restriction
COR helps us implement calling restrictions so only certain users/phones can make calls to certain destinations (eg. maybe a lobby phone should only be able to call internal and maybe most staff should only be able to call local numbers and not long distance).
1. Create COR Tags:
Eg. we are going to create 3 COR Tags, 911, Long Distance and Local Calling which enforces restrictions on the numbers associated with the COR rules.
r2(config)#dial-peer cor custom

r2(config-dp-cor)#name 911
r2(config-dp-cor)#name LongDistance

r2(config-dp-cor)#name Local
Let's view our COR tags:
r2#show dial-peer cor


Class of Restriction

  name: 911

  name: Local

  name: LongDistance
2. Create the outgoing COR Lists and associate them with the tags we created earlier as members.
!we assign our 911 tag to a COR list we call 911-OUT
r2(config-telephony)#dial-peer cor list 911-OUT

r2(config-dp-corlist)#member 911
!we assign our Local tag to a COR list we call Local-OUT
r2(config-dp-corlist)#dial-peer cor list Local-OUT

r2(config-dp-corlist)#member Local
!we assign our LongDistance tag to a COR list we call LongDistance-OUT
r2(config-dp-corlist)#dial-peer cor list LongDistance-OUT

r2(config-dp-corlist)#member LongDistance
3. Create the incoming COR Lists and associate them with the tags we created earlier as members.
Notice that this incoming COR list is more like a database with multiple members. It is a logical way to name them with a - to include all of their member functionality
r2(config-dp-corlist)#dial-peer cor list 911-ONLY

r2(config-dp-corlist)#member 911
r2(config-dp-corlist)#dial-peer cor list 911-LOCAL

r2(config-dp-corlist)#member 911

r2(config-dp-corlist)#member Local
r2(config-dp-corlist)#dial-peer cor list 911-LOCAL-LONGDISTANCE

r2(config-dp-corlist)#member 911

r2(config-dp-corlist)#member Local

r2(config-dp-corlist)#member LongDistance
We have our cor tags and incoming and outgoing lists but we still have to associate them with actual dial-peers for them to take effect.
Keeping track of things let's look at our current cor tags and lists:
do show dial-peer cor
Class of Restriction

  name: 911

  name: Local

  name: LongDistance


COR list <911-OUT>

  member: 911


COR list
  member: Local


COR list
  member: LongDistance


COR list <911-ONLY>

  member: 911


COR list <911-LOCAL>

  member: 911

  member: Local


COR list <911-LOCAL-LONGDISTANCE>

  member: 911

  member: Local

  member: LongDistance
Now we have to assign outgoing call lists to the dial-peer of the phone numbers we want to have these COR restrictions
r2(config-dial-peer)#dial-peer voice 1

r2(config-dial-peer)#corlist outgoing 911-OUT
Now we have to assign incoming call lists to the relevant DNs:
r2(config)#ephone-dn 1

r2(config-ephone-dn)#corlist incoming 911-ONLY
Enable CCME GUI:
First you have to flash to your flash: or disk0:
Then you have to enable the http server and set the password:
Router(config)#ip http server

Router(config)#ip http path disk0:/gui

Router(config)#telephony-service

Router(config-telephony)# web admin system name admin password allyourbasearebelongtome

Router(config-telephony)# dn-webedit

Router(config-telephony)# time-webedit
After that visit http://your-router-ip/ccme.html
Note that you need ccme.html otherwise you are hitting the level 15 web interface instead.
Enter the username "admin" and password that you set above "allyourbasearebelongtome"
Here is what the GUI will look like:

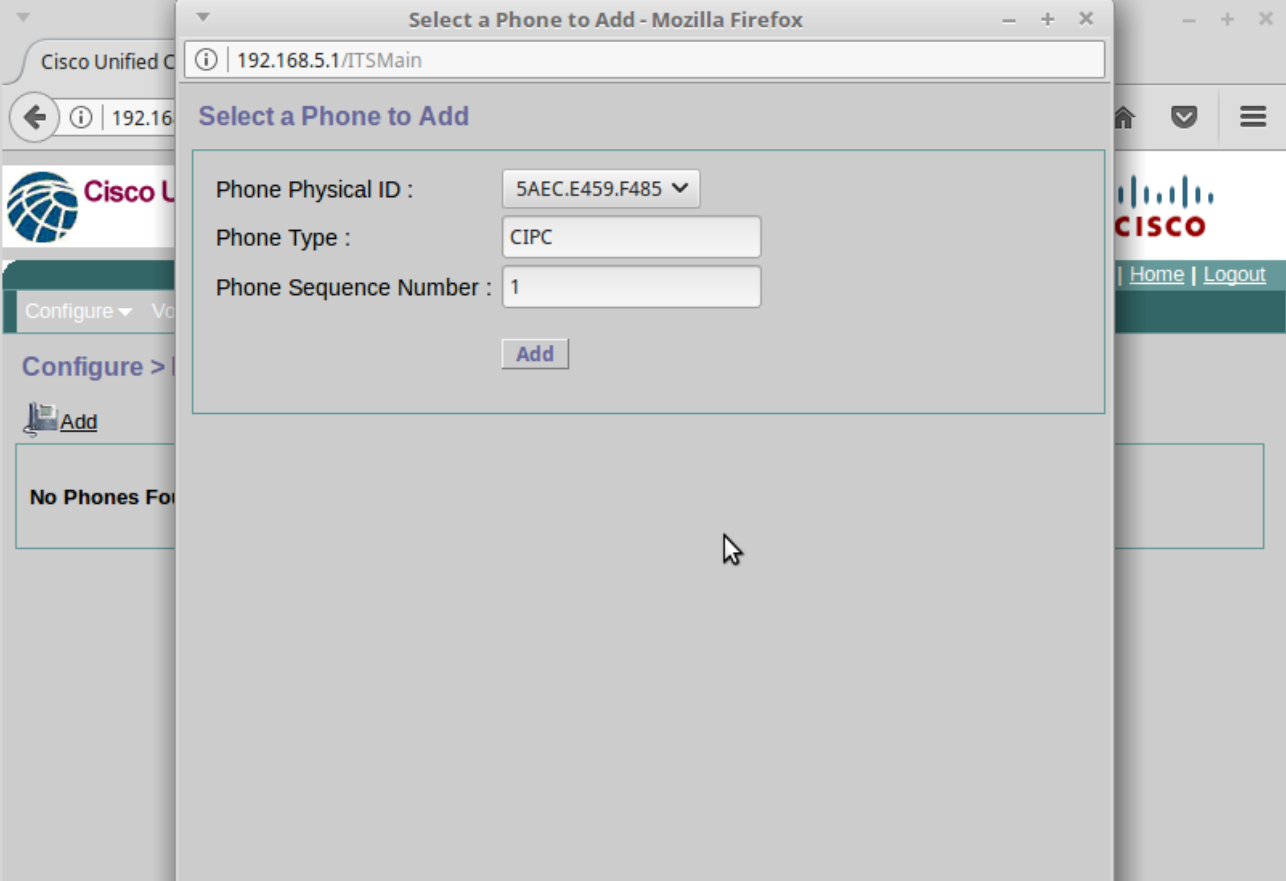
To add a phone click on "Configure" and then "Phones" and click "Add".
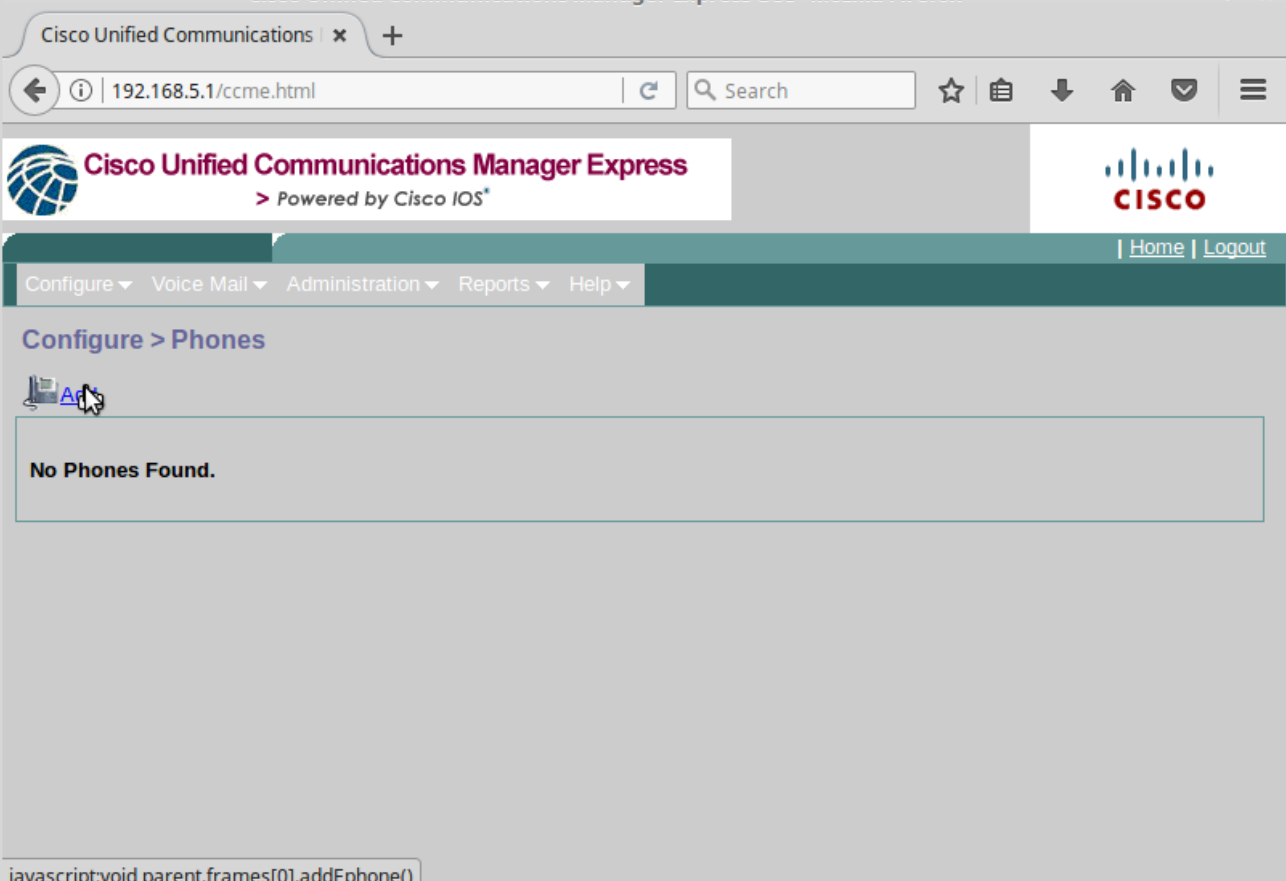
You will have a dropdown of all the registered phones that have not been added and the phones will be listed by MAC
After you add the phone you can add extensions (in Firefox/non-IE) it appears you also cannot associate your phone with an extension.
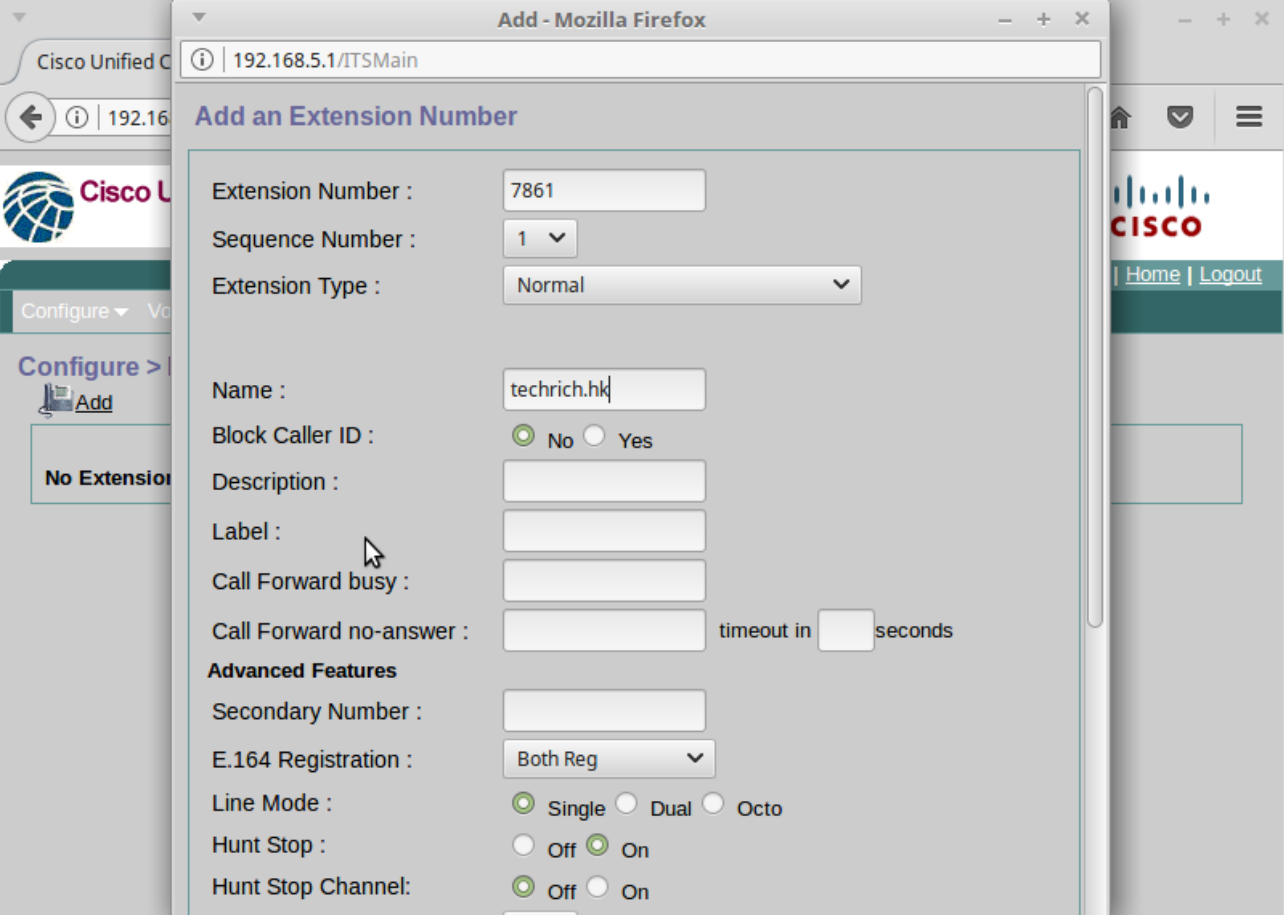
Navigate to "Configure" and "Extensions" and click "Add".
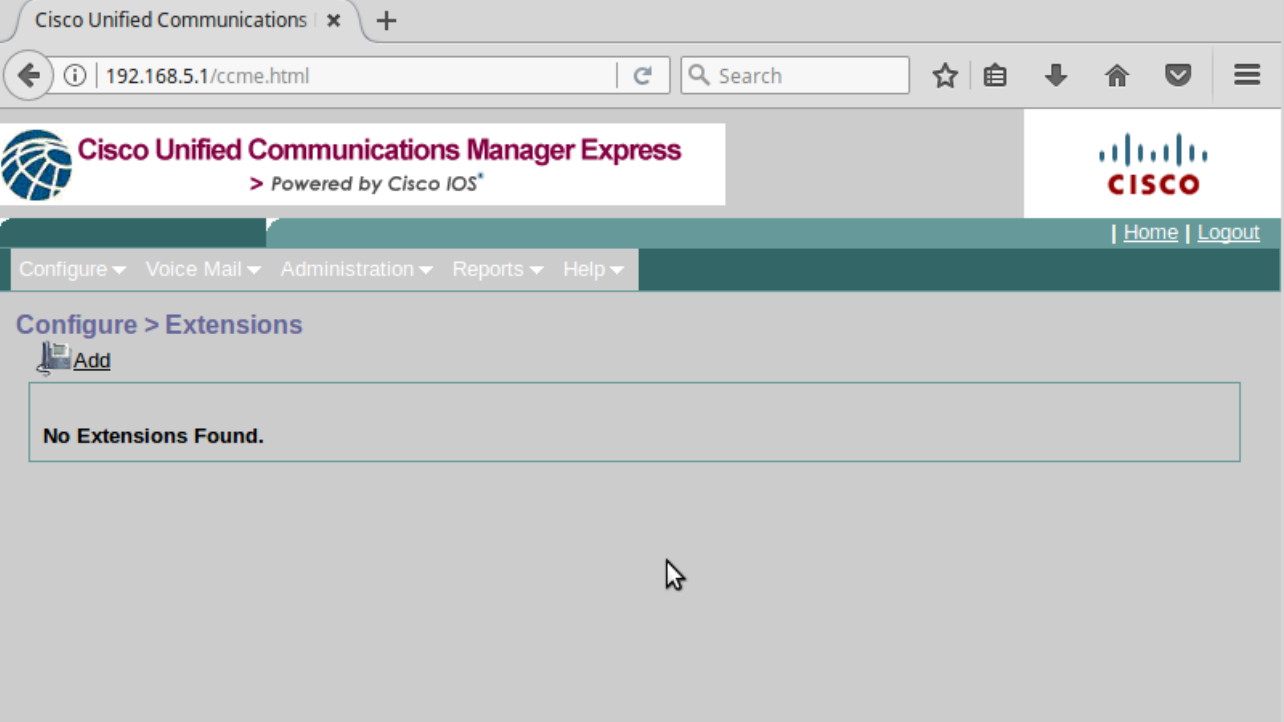
Type the extension number and then click add. It's now easier to use the CLI and go to the relevant ephone and assign using button 1:sequence number.
Tags:
cisco, unified, communications, cheatsheet, cucme, cmefigure, assigned, router, ephone, dp, primary, intercom, dn, summary, ephones, hairpin_block, tcp, socket, activeline, whisperline, registered, mediaactive, whisper_mediaactive, startmedia, offhook, reset, reset_sent, debug, primary_dn, ip, cipc, keepalive, unregistered, deceased, sockets, ephone_send_packet, conferences, active, moh, acd, sccp, ver, max_streams, paging, caps, max_line, available_line, ch, idle, preferred, codec, ulaw,