
How To Setup a Cisco CME (Cisco Manager Express) Virtual Router under Linux using dynamips and dynagen
This tutorial will get your router up and running using emulation tools. In this case we'll be getting a Cisco C7206 (C7200 series) VXR router going which also supports SCCP VOIP services.
dynamips is the emulator itself and dynagen is the front-end tool that helps us control everything. It is used by tools such as gns3 and eve-ng.
Together the two tools (dynamips and dynagen) allow us to create and emulate REAL routers and switches that can be used on a real or virtual LAN for testing purposes, through full emulation, by using the actual, real firmware of some older Cisco devices.
1.) Install dynagen and dynamips
I recommend Debian 9 or Mint 18 for this. Newer Linux versions may not include these tools.
sudo apt install dynamips dynagen
2.) Configure your bridge or br0
In linux a bridge is just a layer 2 virtual switch that allows other devices to have connectivity. In this case we want a bridge so our router can communicate with the rest of our LAN, whether the LAN is physical or a virtual LAN with an environment like VBOX/VMWare/QEMU.
If you don't have a br0 on your Linux machine then follow this guide to create a bridge br0 in Linux or video guide to create a br0 in Linux for Debian:
Alternatively you can use NIO_linux_eth:eth0 for f0/0 below but remember the host machine cannot talk to the router then.
3.) Create your dynagen config
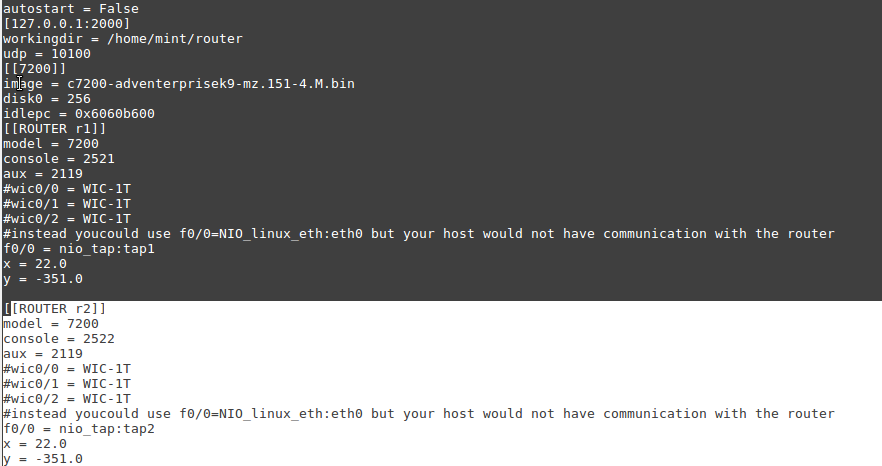
Save the file below to a file such as "myconfig.conf" (the filename itself does not matter and can be anything but make sure you know the name of your config file).
#Example Dynamips config:
autostart = False

[127.0.0.1:2000]

#change workingdir to your directory (I recommend creating router in your home and placing all files there

workingdir = /home/mint/router

udp = 10100

[[7200]]

#change the image name to be what you have

image = c7200-adventerprisek9-mz.151-4.M.bin

disk0 = 256

#idlepc = 0x60be916c

[[ROUTER r1]]

model = 7200

console = 2521

aux = 2119

#wic0/0 = WIC-1T

#wic0/1 = WIC-1T

#wic0/2 = WIC-1T

#instead youcould use f0/0=NIO_linux_eth:eth0 but your host would not have communication with the router

f0/0 = nio_tap:tap1

x = 22.0

y = -351.0
How can we add additional routers?
Just copy the [[ROUTER r1]] portion and everything below it and modify some key portions. For example if you add a second router then change the following:
ROUTER r1 to ROUTER r2
console = 2521 to console = 2522
f0/0 = nio_tap:tap2
Basically we are just incrementing those values so we don't have conflicting tap devices and conflicting console ports..
Here is what we would paste under the existing config above if we wanted to add an R2:
[[ROUTER r2]]

model = 7200

console = 2522

aux = 2119

#wic0/0 = WIC-1T

#wic0/1 = WIC-1T

#wic0/2 = WIC-1T

#instead youcould use f0/0=NIO_linux_eth:eth0 but your host would not have communication with the router

f0/0 = nio_tap:tap2

x = 22.0

y = -351.0
4.) Start dynamips emulator
sudo dynamips -H 2000&
5.) Start your router using dynagen
This file is the one you created in Step#3
sudo dynagen yourconffromstep3.conf
start r1
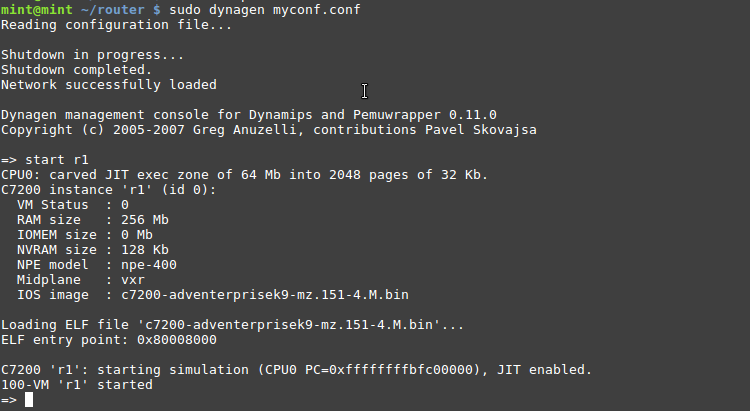
If you get errors (eg. topology), make sure that dynamips is started and that your dynagen config file is correct.
6.) Connect to your router and configure
We will telnet to port 2521 since we defined the console port as being 2521 in our dynagen config eariler, which puts us on the console of the router (eg. the same thing as plugging into the console port of a real router via serial cable).
Change below to what works for you, whether you want a different static IP or for it to get a DHCP address. Definitely remember to do a no shut to activate the port and after configuring do a "do wr" to save the config.
telnet localhost 2521
enable

conf t

int fa0/0

ip address 192.168.5.1 255.255.255.0

no shut
If you want to stop the annoying Cisco tftp timeout/denied errors check here.
If you want to stop DNS lookups based on invalid commands / typos in enable mode click here.
7.) Test connectivity
Make sure you put your tap1 on the bridge and put up tap1. After this you should be able to ping your router but remember your host's br0:0 should be created and be on the same subnet to work.
sudo brctl addif br0 tap1
sudo ifconfig tap1 up
Performance Tuning
I recommend you set calculate and set idlepc, as a wrong value or no value will guarantee it will use at least ~100% of the CPU core dynamips is on. Check this guide here to set idlepc for dynamips with dynagen
I also recommend having at least 2 cores for the VM or at least 1 core per virtual router.
If you don't set idlepc you are likely to have random and bizarre issues with phones dropping out and being unable to register sometimes and other issues with the routers not responding or freezing.
How do you configure Cisco Telephony Service / CME guide/tutorial?
How can we do this without Dynagen?
Remember that you still have to bridge your tap device and put it up with this method.
Here is an example of getting r1 started with dynamips directly:
dynamips -i 1 -X -p 0:C7200-IO-FE -s 0:0:tap:tap1 c7200-adventerprisek9-mz.151-4.M.bin -T 2521
-i means instance ID so we specified it as 1
-X means do not use a ghostfile EG use disk as a swap file (this gives better performance)
-p 0:C7200-IO-FE means we are adding the C7200-IO-FE adapter otherwise there are no ports
If you want the 2 adapter version then use -p 0:C7200-IO-2FE
-s 0:0:tap:tap1 is our slot 0:0 FE port being connected to tap1
c7200-adventerprisek9-mz.151-4.M.bin is the name of the image we are using
-T 2521 means to put the console on port 2521 via telnet
We can of course add our idlepc value with --idle-pc yourXidlePCvalue
dynamips -i 1 --idle-pc=0x6060b2d4 -X -p 0:C7200-IO-FE -s 0:0:tap:tap1 c7200-adventerprisek9-mz.151-4.M.bin -T 2521
Helpful Dynagen and Dynamips Startup Script
This script as it is will get your r1 and r2 router up without typing any commands. All you have to do is change the .conf file name to your own and make sure to save the contents of the script to an "something.sh", chmod +x something.sh and then ./something.sh and it will automatically get you going. It also kills any other instances of dynamips or dynagen to avoid conflicts. The only thing it does need is sudo so it will ask for your sudo password.
Remember that you need "expect" installed or this script will not work (use apt install expect or yum install expect).
The script makes a few assumptions but you can of course change it.
1.) Dynamips is to be started on port 2000 if not change it!
2.) That you want to create two tap devices "tap1" and "tap2" and add them to your bridge br0
3.) It also assumes you are in the directory of "yourconffile.conf" in bold in the script below. Change that name to the name of yours
4.) Finally it also assumes that you have routers r1 and r2 that you want to be started automatically in the send "start r1\n" area. You can add more lines for more routers or change the names according to your needs.
#!/bin/bash

sudo killall dynamips dynagen

sudo dynamips -H 2000 &


sudo ip tuntap add tap1 mode tap

sudo ip tuntap add tap2 mode tap

sudo brctl addif br0 tap1

sudo brctl addif br0 tap2


sudo ifconfig tap1 up

sudo ifconfig tap2 up


expect <(cat <<'EOD'

spawn dynagen yourconffile.conf

expect "Dynagen management console for Dynamips"

send "start r1\n"

send "start r2\n"

interact

exit

EOD

)
Tags:
cisco, cme, virtual, router, linux, dynamips, dynagenexample, config, autostart, workingdir, mint, udp, adventerprisek, mz, bin, disk, idlepc, console, aux, wic, nio_tap,