EFI PXE grub2 Howto guide for Linux EFI PXE Booting on Debian, Mint, Ubuntu, RHEL
Just a quick note and warning is that if you are testing to see if EFI PXE booting works on a VM, MAKE SURE it actually works. For example I initially tested using my Distro's QEMU 2.5+dfsg-5ubuntu10.46 and ovmf BIOS firmware (OVMF supports EFI). However, I found on old versions of QEMU (like 2.5), EFI booting with GRUB NEVER works so it may appear that you have made a mistake when everything is fine when you boot a physical machine. But it does work fine with QEMU 4.2.0 that I compiled.
So if you've followed this guide and verified your firewall is not blocking things, that your tftp server IP is correct, and your DHCP is configured correctly, and your tftp server is configured correctly, then consider trying a physical machine or newer version of whatever emulation you are using to test via VM.
The only way I could get this to work was to use my own compiled grub 2.04 (some previous versions of grub are said to be buggy and don't work with EFI apparently).
Step 1 - Compile grub 2.04 and create your EFI image to be served from your tftp server
Be sure to install the build tools if you don't have them already: apt -y install build-essential bison flex
Download grub 2.04 source: https://ftp.gnu.org/gnu/grub/grub-2.04.tar.gz
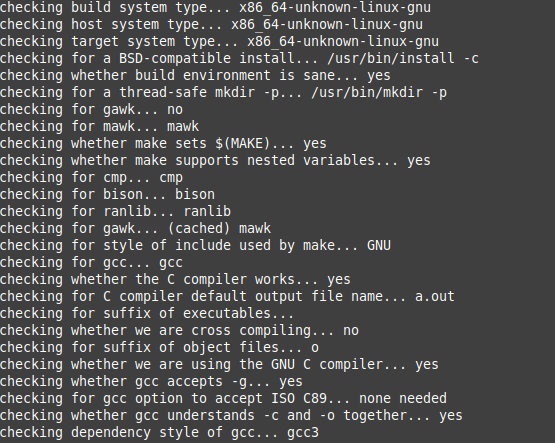
Make sure you run ./configure --with-platform=efi

You should have something like below if the config was successful
realtechtalk.com ~$:tftp
tftp> quit
realtechtalk.com ~$:tftp 192.168.1.252 get BOOTx64.EFI
usage: tftp host-name [port]
tftp> quit
realtechtalk.com ~$:tftp --help
--help: unknown host
tftp> quit
realtechtalk.com ~$:man tftp
realtechtalk.com ~$:tftp
tftp> quit
realtechtalk.com ~$:tftp 192.168.1.252
tftp> get BOOTx64.EFI
Transfer timed out.
tftp>
Enter your compiled grub 2.04 directory and execute this:
./grub-mkimage -d grub-core --format=x86_64-efi -p "/" --output=BOOTx64.EFI `ls grub-core | sed -n 's/\.mod$//gp'`
We use our own grub 2.04 compiled mkimage: ./grub-mkimage
We tell it to make a 64-bit EFI grub2 boot image: --format=x86_64-efi
We tell it where to look for the grub.cfg file which we declare to be the root of the tftp server: -p "/"
*eg if your tftp is in /tftpboot then grub.cfg is /tftpboot/grub.cfg, or if it's /srv/tftp then it will search for grub.cfg in /srv/tftp/grub.cfg
We declare the output file to be called "BOOTx64.EFI" but in theory it could be output anywhere and called anything: --output=BOOTx64.EFI
We compile ALL grub modules into the .EFI image so there is no issues with grub trying to find or load modules in x86_64-efi directory: `ls grub-core | sed -n 's/\.mod$//gp'`
grub-core is relative to your manually compiled grub2.04 directory and the command finds all grub modules (by searching for anything ending in .mod) and including them. There is little penalty for doing this as a normal tftp and efi module include would make an image about 232K and including all modules makes it about 2.5M.
Step 2 - Install and configure your tftpd-hpa server
apt install tftpd-hpa
If you install the tftpd-hpa server in a newer Debian, the default serving directory is /srv/tftp.
You can edit /etc/default/tftpd-hpa and restart the service to change this TFTP_DIRECTORY="/srv/tftp"
I recommend editing the above config file to add -v to the options so you can see a log in /var/log/daemon.log of what if any files are being requested for troubleshooting purposes: TFTP_OPTIONS="--secure -v"
Set the correct permissions as tftp.tftp in /srv/tftp or whatever directory you specify in the config;
chown tftp.tftp -R /srv/tftp
If you are not sure it is correct you can do a ps aux and see the user that it runs as or check TFTP_USERNAME="tftp"
in /etc/default/tftpd-hpa
Copy the BOOTx64.EFI created in the previous step to /srv/tftp
*do not use a pre-existing one from your distro or ISO as it will probably NOT work and only give you the plain grub screen without any menu)
Create grub.cfg in /srv/tftp
Example (modify to suite your needs/distro you are serving):
if loadfont /boot/grub/font.pf2 ; then

        set gfxmode=auto

        insmod efi_gop

        insmod efi_uga

        insmod gfxterm

        terminal_output gfxterm

fi


set menu_color_normal=white/black

set menu_color_highlight=black/light-gray


menuentry "Start Linux Mint 20.1 MATE 64-bit" --class linuxmint {

        set gfxpayload=keep

        linux   images/mint20/casper/vmlinuz root=/dev/nfs ip=dhcp boot=casper netboot=nfs nfsroot=192.168.1.250:/srv/tftp/images/mint20

        initrd  images/mint20/casper/initrd.lz

}
Step 3- Now you need to configure your DHCP server to tell clients where to find your tftp server:
Linux ISC DHCP server/dhcpd:
I assume your tftp server is 10.10.10.200 in this example and that your IP range for clients is the same /24
Be sure to change the IPs + ranges to match your needs.
next-server= the IP of your tftp server
vi /etc/dhcp/dhcpd.conf
allow booting;

allow bootp;

option option-128 code 128 = string;

option option-129 code 129 = text;

#filename "/pxelinux.0";

#filename "pxelinux.0";

filename "BOOTx64.EFI";

option option-209 code 209 = string;

next-server 10.10.10.200;

authoritative;

ddns-update-style none;

subnet 10.10.10.0 netmask 255.255.255.0 {

  range 10.10.10.2 10.10.10.200;

  #deny unknown-clients;

  option routers 10.10.10.1;

  option domain-name-servers 208.67.222.222;

  filename "BOOTx64.EFI";


}
In Juniper's JunOS you will do something like this
Enter config mode and enter these commands:
#create DHCP pool with your range
set system services dhcp pool 10.10.10.0/24
#set your default gateway as 10.10.10.1
set system services dhcp pool 10.10.10.0/24 router 10.10.10.1
# set the dns servers that clients use to be OpenDNS's servers
set system services dhcp pool 10.10.10.0/24 name-server 208.67.222.222

set system services dhcp pool 10.10.10.0/24 name-server 208.67.220.220
#tell the DHCP clients to use the BOOTx64.EFI file for grub
set system services dhcp boot-file BOOTx64.EFI
#set tftp and next server to be the tftp server .200 (without next-server the client may try to retrieve the files from the dhcp server instead.
set system services dhcp boot-server 10.10.10.200

set system services dhcp next-server 10.10.10.200
#set the range of IPs to be given out eg. .2 to .200
set system services dhcp pool 10.10.10.0/24 address-range low 10.10.10.2 high 10.10.10.200
#an example of how to exclude certain addresses if they are within  the range you define to be given out (if possible just leave them out  of the range and then there's no need to exclude)


set system services dhcp pool 10.10.10.0/24 exclude-address 10.10.10.50
Step 4 - Test It
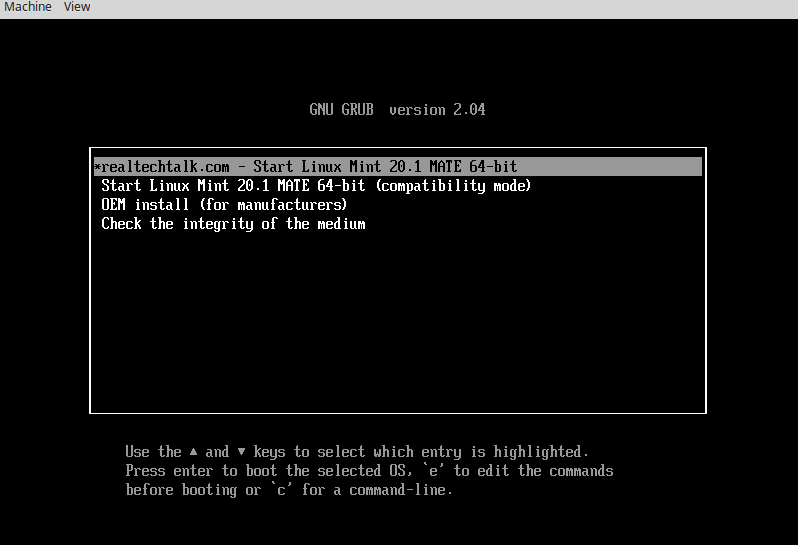
If all went well you should be able to see the proper grub screen and menu on your client. If not check your config above and work backwards (eg. does the client get a proper DHCP IP. is it hitting your tftp server at all?).

Test using QEMU Netboot
qemu-system-x86_64 -smp 8 -m 4096 -enable-kvm -net nic,netdev=hn1 -netdev bridge,id=hn1 -boot n -bios /usr/share/ovmf/OVMF.fd -vnc :1
Troubleshooting
Test tftp first, can you get the BOOTx64.EFI file?
tftp 10.10.10.25

tftp> get BOOTx64.EFI

Received 2666092 bytes in 0.8 seconds

tftp>
Can you mount the nfs?
mount -t nfs 10.10.10.24:/srv/tftp/images/mint20 mount

cd mount

ls
You should be able to see the directory structure:
boot casper dists EFI isolinux MD5SUMS pool preseed README.diskdefines
Tags:
efi, pxe, grub, howto, linux, booting, debian, mint, ubuntu, rheljust, vm, initially, distro, qemu, dfsg, ovmf, bios, firmware, supports, versions, compiled, ve, verified, firewall, blocking, tftp, server, ip, dhcp, configured, correctly, newer, emulation, via, previous, buggy, compile, download, https, ftp, gnu, org, tar, gz, configure, platform, directory, execute, mkimage, format, _, quot, output, bootx, ls, sed, mod, gp, cfg, declare, eg, tftpboot, srv, modules, relative, manually, penalty, module, install, tftpd, hpa, apt, default, edit, etc, restart, tftp_directory, editing, config, var, daemon, requested, troubleshooting, purposes, tftp_options, existing, iso, modify, loadfont, font, pf, gfxmode, auto, insmod, efi_gop, efi_uga, gfxterm, terminal_output, fi, menu_color_normal, menu_color_highlight, menuentry, linuxmint, gfxpayload, images, casper, vmlinuz, dev, nfs, netboot, nfsroot, initrd, lz, isc, dhcpd, ips, ranges, vi, conf, bootp, text, filename, pxelinux, authoritative, ddns, update, subnet, netmask, routers, domain, servers, juniper, junos, mode, commands, gateway, router, dns, opendns, retrieve, exclude, addresses, define,
