
How To Create OpenVPN Server for Secure Remote Corporate Access in Linux Debian/Mint/Ubuntu with client public key authentication

Why choose OpenVPN instead of a firewall appliance?
OpenVPN can be a reliable and easy replacement for traditional hardware or just be an additional tool that your company uses so that the firewall can focus on its job rather than acting as a VPN appliance at the same time.
When comparing OpenVPN with traditional firewall appliances for VPN functionalities, OpenVPN stands out with its flexibility, cost-effectiveness, and performance capabilities.
One key thing is that if you follow a guide like this, there are 0 license fees, whereas the OpenVPN Access Server is charged per connection/user. By having the knowledge or hiring a competent firm, you can have more VPN throughput for essentially free (or just the cost of maintenance/network administration).
Flexibility
One of the most significant advantages of OpenVPN is its exceptional flexibility. Unlike GRE, IPSec, L2TP, and PPTP VPNs, which may require special protocol support from local networks and routers, OpenVPN can operate over virtually any TCP or UDP port. This flexibility is particularly advantageous in environments with restrictive network policies, such as hotels or public Wi-Fi networks, where traditional VPN protocols are often blocked or throttled. By leveraging common ports, such as TCP 443, OpenVPN traffic can be indistinguishable from regular HTTPS traffic, effectively bypassing these restrictions and ensuring reliable connectivity from nearly any location.
Cost-Effectiveness
From a cost perspective, OpenVPN presents a compelling argument when compared to hardware-based firewall appliances. Many firewall appliances can be expensive, not only in terms of initial investment but also considering maintenance and licensing fees. OpenVPN, on the other hand, can be deployed on a standard server or even within a virtual machine (VM), leveraging existing hardware and virtualization technologies. This approach allows for significant savings while still achieving the desired VPN functionality. The open-source nature of OpenVPN further enhances its cost-effectiveness, as there are no licensing fees associated with its deployment.
Performance and Reliability
Regarding performance and reliability, OpenVPN, when configured on a capable server or set of redundant VMs with fast networking, can outperform many dedicated firewall appliances. The average server today is powerful enough to handle a substantial amount of VPN traffic, offering higher throughput levels than what might be possible with a specialized but potentially less powerful firewall appliance. Furthermore, deploying OpenVPN in a redundant configuration across multiple VMs can provide high availability and fault tolerance, ensuring continuous VPN service even in the event of a hardware failure or other issues affecting a single server.
This redundancy and scalability are not always readily achievable with physical firewall appliances without incurring additional costs for more hardware and complex clustering configurations. Virtualization technologies allow for rapid deployment, scaling, and migration of OpenVPN instances, which can be crucial for businesses requiring dynamic adjustment to their network load or topology.
Here is a link to the step-by-step OpenVPN video that implements this solution.
This guide assumes that you are trying to connect to a corporate network. The config assumes that you have dual NICs on the server with a public and private subnet.
First of all you need to define what IP range the OpenVPN server will be running on.
Network Option 1.)
There are a few options, such as the OpenVPN sitting exclusively on the internal network, with the port and protocol that the server is used on being forwarded to this via the router and/or firewall.
Network Option 2.)
The OpenVPN server could sit on both the public and private network segments with an IP on the public side and an IP on the LAN side. For routing and firewalling it would be desirable to have two separate NICs (1 for each side).
Note that this all occurs on the OpenVPN Server Side
1.) Install the OpenVPN Server
apt install openvpn easy-rsa

Reading package lists... Done

Building dependency tree

Reading state information... Done

The following additional packages will be installed:

  easy-rsa libccid libglib2.0-0 libglib2.0-data libicu63 liblzo2-2

  libpcsclite1 libpkcs11-helper1 libxml2 opensc opensc-pkcs11 pcscd

  shared-mime-info xdg-user-dirs

Suggested packages:

  pcmciautils resolvconf openvpn-systemd-resolved

The following NEW packages will be installed:

  easy-rsa libccid libglib2.0-0 libglib2.0-data libicu63 liblzo2-2

  libpcsclite1 libpkcs11-helper1 libxml2 opensc opensc-pkcs11 openvpn pcscd

  shared-mime-info xdg-user-dirs

0 upgraded, 15 newly installed, 0 to remove and 66 not upgraded.

Need to get 14.4 MB of archives.

After this operation, 58.6 MB of additional disk space will be used.

Do you want to continue? [Y/n] y

Get:1 http://deb.debian.org/debian buster/main amd64 easy-rsa all 3.0.6-1 [37.9 kB]

Get:2 http://deb.debian.org/debian buster/main amd64 libccid amd64 1.4.30-1 [334 kB]

Get:3 http://deb.debian.org/debian buster/main amd64 libglib2.0-0 amd64 2.58.3-2+deb10u3 [1,259 kB]

Get:4 http://deb.debian.org/debian buster/main amd64 libglib2.0-data all 2.58.3-2+deb10u3 [1,111 kB]

Get:5 http://deb.debian.org/debian buster/main amd64 libicu63 amd64 63.1-6+deb10u1 [8,300 kB]

Get:6 http://deb.debian.org/debian buster/main amd64 liblzo2-2 amd64 2.10-0.1 [56.1 kB]

Get:7 http://deb.debian.org/debian buster/main amd64 libpcsclite1 amd64 1.8.24-1 [58.5 kB]

Get:8 http://deb.debian.org/debian buster/main amd64 libpkcs11-helper1 amd64 1.25.1-1 [47.6 kB]

Get:9 http://deb.debian.org/debian buster/main amd64 libxml2 amd64 2.9.4+dfsg1-7+deb10u2 [689 kB]

Get:10 http://deb.debian.org/debian buster/main amd64 opensc-pkcs11 amd64 0.19.0-1 [826 kB]

Get:11 http://deb.debian.org/debian buster/main amd64 opensc amd64 0.19.0-1 [305 kB]

Get:12 http://deb.debian.org/debian buster/main amd64 openvpn amd64 2.4.7-1+deb10u1 [490 kB]

Get:13 http://deb.debian.org/debian buster/main amd64 pcscd amd64 1.8.24-1 [95.3 kB]

Get:14 http://deb.debian.org/debian buster/main amd64 shared-mime-info amd64 1.10-1 [766 kB]

Get:15 http://deb.debian.org/debian buster/main amd64 xdg-user-dirs amd64 0.17-2 [53.8 kB]

Fetched 14.4 MB in 1s (17.7 MB/s)

Preconfiguring packages ...

Selecting previously unselected package easy-rsa.

(Reading database ... 116865 files and directories currently installed.)

Preparing to unpack .../00-easy-rsa_3.0.6-1_all.deb ...

Unpacking easy-rsa (3.0.6-1) ...

Selecting previously unselected package libccid.

Preparing to unpack .../01-libccid_1.4.30-1_amd64.deb ...

Unpacking libccid (1.4.30-1) ...

Selecting previously unselected package libglib2.0-0:amd64.

Preparing to unpack .../02-libglib2.0-0_2.58.3-2+deb10u3_amd64.deb ...

Unpacking libglib2.0-0:amd64 (2.58.3-2+deb10u3) ...

Selecting previously unselected package libglib2.0-data.

Preparing to unpack .../03-libglib2.0-data_2.58.3-2+deb10u3_all.deb ...

Unpacking libglib2.0-data (2.58.3-2+deb10u3) ...

Selecting previously unselected package libicu63:amd64.

Preparing to unpack .../04-libicu63_63.1-6+deb10u1_amd64.deb ...

Unpacking libicu63:amd64 (63.1-6+deb10u1) ...

Selecting previously unselected package liblzo2-2:amd64.

Preparing to unpack .../05-liblzo2-2_2.10-0.1_amd64.deb ...

Unpacking liblzo2-2:amd64 (2.10-0.1) ...

Selecting previously unselected package libpcsclite1:amd64.

Preparing to unpack .../06-libpcsclite1_1.8.24-1_amd64.deb ...

Unpacking libpcsclite1:amd64 (1.8.24-1) ...

Selecting previously unselected package libpkcs11-helper1:amd64.

Preparing to unpack .../07-libpkcs11-helper1_1.25.1-1_amd64.deb ...

Unpacking libpkcs11-helper1:amd64 (1.25.1-1) ...

Selecting previously unselected package libxml2:amd64.

Preparing to unpack .../08-libxml2_2.9.4+dfsg1-7+deb10u2_amd64.deb ...

Unpacking libxml2:amd64 (2.9.4+dfsg1-7+deb10u2) ...

Selecting previously unselected package opensc-pkcs11:amd64.

Preparing to unpack .../09-opensc-pkcs11_0.19.0-1_amd64.deb ...

Unpacking opensc-pkcs11:amd64 (0.19.0-1) ...

Selecting previously unselected package opensc.

Preparing to unpack .../10-opensc_0.19.0-1_amd64.deb ...

Unpacking opensc (0.19.0-1) ...

Selecting previously unselected package openvpn.

Preparing to unpack .../11-openvpn_2.4.7-1+deb10u1_amd64.deb ...

Unpacking openvpn (2.4.7-1+deb10u1) ...

Selecting previously unselected package pcscd.

Preparing to unpack .../12-pcscd_1.8.24-1_amd64.deb ...

Unpacking pcscd (1.8.24-1) ...

Selecting previously unselected package shared-mime-info.

Preparing to unpack .../13-shared-mime-info_1.10-1_amd64.deb ...

Unpacking shared-mime-info (1.10-1) ...

Selecting previously unselected package xdg-user-dirs.

Preparing to unpack .../14-xdg-user-dirs_0.17-2_amd64.deb ...

Unpacking xdg-user-dirs (0.17-2) ...

Setting up xdg-user-dirs (0.17-2) ...

Setting up libccid (1.4.30-1) ...

Setting up libglib2.0-0:amd64 (2.58.3-2+deb10u3) ...

No schema files found: doing nothing.

Setting up liblzo2-2:amd64 (2.10-0.1) ...

Setting up libpkcs11-helper1:amd64 (1.25.1-1) ...

Setting up libicu63:amd64 (63.1-6+deb10u1) ...

Setting up opensc-pkcs11:amd64 (0.19.0-1) ...

Setting up libglib2.0-data (2.58.3-2+deb10u3) ...

Setting up libpcsclite1:amd64 (1.8.24-1) ...

Setting up easy-rsa (3.0.6-1) ...

Setting up libxml2:amd64 (2.9.4+dfsg1-7+deb10u2) ...

Setting up openvpn (2.4.7-1+deb10u1) ...

[ ok ] Restarting virtual private network daemon.:.

Created symlink /etc/systemd/system/multi-user.target.wants/openvpn.service → /lib/systemd/system/openvpn.service.

Setting up opensc (0.19.0-1) ...

Setting up pcscd (1.8.24-1) ...

Created symlink /etc/systemd/system/sockets.target.wants/pcscd.socket → /lib/systemd/system/pcscd.socket.

Setting up shared-mime-info (1.10-1) ...

Processing triggers for libc-bin (2.28-10) ...

Processing triggers for systemd (241-7~deb10u4) ...

Processing triggers for mime-support (3.62) ...
2.) Create Certificates for OpenVPN Server
We will use the handy utilities from easy-rsa that were installed above when we installed OpenVPN:
This commands below creates a directory "rttCerts" with everything we need to generate our certificates
make-cadir rttCerts
An ls reveals the scripts and other directories created inside rttCerts
root@rtt:~/rttCerts# ls

easyrsa  openssl-easyrsa.cnf  vars  x509-types
Use init-pki to get started
./easyrsa init-pki
Note: using Easy-RSA configuration from: ./vars


init-pki complete; you may now create a CA or requests.

Your newly created PKI dir is: /root/rttCerts/pki
Generate our DH (Diffie Helman) Exchange Key
./easyrsa gen-dh
Note: using Easy-RSA configuration from: ./vars


Using SSL: openssl OpenSSL 1.1.1d  10 Sep 2019

Generating DH parameters, 2048 bit long safe prime, generator 2

This is going to take a long time

....................................+..........................................................................................................................................................................................................+.......+...................................................................................................+...........................................................................................................................................................................................................................................................................................................................................................................................................................................................................................................................................................................................................................................................................................................................++*++*++*++*


DH parameters of size 2048 created at /root/rttCerts/pki/dh.pem
Create CA Signing Authority
./easyrsa build-ca nopass
Using SSL: openssl OpenSSL 1.1.1k  25 Mar 2021

Generating RSA private key, 2048 bit long modulus (2 primes)

.............................................................+++++

................................................+++++

e is 65537 (0x010001)

You are about to be asked to enter information that will be incorporated

into your certificate request.

What you are about to enter is what is called a Distinguished Name or a DN.

There are quite a few fields but you can leave some blank

For some fields there will be a default value,

If you enter '.', the field will be left blank.

-----

Common Name (eg: your user, host, or server name) [Easy-RSA CA]:realtechtalk.com


CA creation complete and you may now import and sign cert requests.

Your new CA certificate file for publishing is at:

/root/rttCerts/pki/ca.crt
Generate CSR (Certificate Signing Request) based on our CA above
#note that I chose the filename rttrequest.csr, you can change it if you like
./easyrsa gen-req rttrequest.csr nopass
Using SSL: openssl OpenSSL 1.1.1k  25 Mar 2021

Generating a RSA private key

.................+++++

.................+++++

writing new private key to '/root/rttCerts/pki/easy-rsa-6372.llwk7t/tmp.63Pxuj'

-----

You are about to be asked to enter information that will be incorporated

into your certificate request.

What you are about to enter is what is called a Distinguished Name or a DN.

There are quite a few fields but you can leave some blank

For some fields there will be a default value,

If you enter '.', the field will be left blank.

-----

Common Name (eg: your user, host, or server name) [rttrequest.csr]:realtechtalk.com


Keypair and certificate request completed. Your files are:

req: /root/rttCerts/pki/reqs/rttrequest.csr.req

key: /root/rttCerts/pki/private/rttrequest.csr.key
Create our Server Key
Note the first argument is server and the second argument is the .csr we created above.
./easyrsa sign-req server rttrequest.csr
Note: using Easy-RSA configuration from: ./vars


Using SSL: openssl OpenSSL 1.1.1d  10 Sep 2019


You are about to sign the following certificate.

Please check over the details shown below for accuracy. Note that this request

has not been cryptographically verified. Please be sure it came from a trusted

source or that you have verified the request checksum with the sender.


Request subject, to be signed as a server certificate for 1080 days:


subject=

    commonName                = realtechtalk.com


Type the word 'yes' to continue, or any other input to abort.

  Confirm request details: yes

Using configuration from /root/rttCerts/pki/safessl-easyrsa.cnf

Enter pass phrase for /root/rttCerts/pki/private/ca.key:

Check that the request matches the signature

Signature ok

The Subject's Distinguished Name is as follows

commonName            :ASN.1 12:'realtechtalk.com'

Certificate is to be certified until Jan 31 18:15:13 2025 GMT (1080 days)


Write out database with 1 new entries

Data Base Updated


Certificate created at: /root/rttCerts/pki/issued/rttrequest.csr.crt
Let's copy these created key/cert files to /etc/openvpn/:
/root/rttCerts/pki/dh.pem
/root/rttCerts/pki/ca.crt
/root/rttCerts/pki/issued/rttrequest.csr.crt
/root/rttCerts/pki/private/rttrequest.csr.key
cp /root/rttCerts/pki/private/rttrequest.csr.key /root/rttCerts/pki/dh.pem /root/rttCerts/pki/ca.crt /root/rttCerts/pki/issued/rttrequest.csr.crt /etc/openvpn/
3.) Configure OpenVPN Server
In newer distros including Debian the config file for the server is stored here:
/etc/openvpn/server/
The traditional way is to just name the file within the path as "server.conf"
Let's describe the key elements that server.conf will need to act as a server based on the specs we choose:
#this specifies the port that the OpenVPN server will listen on

port 4443

# specify the protocol as tcp

proto tcp-server

# if we have a tcp-server we need to set the tls-server option or the server won't start

tls-server

# we have to set the mode as server

mode server

#this specifies the adapter mode (TUN or TAP).  TUN is used as "routing mode" and is normally recommended

#TAP is for more advanced use and creates a bridge, although some clients may not be able to use this mode due to permissions on certain computers/devices

dev tun

#diffie helman exchange cert that we create

dh dh.pem

#OpenVPN Server Certificate that we created

ca ca.crt

tun-mtu 1500

#OpenVPN Server Key that we created

key rttrequest.csr.key

cert rttrequest.csr.crt

# This is helpful to ensure that traffic destined for the OpenVPN IP range (change the subnet to be the one you use on your LAN) are routed to the OpenVPN server IP via the tunnel otherwise your VPN won't work

push "route 192.168.1.0 255.255.255.0"

# 10.10.10.85 becomes the IP of tun0 on the server that users connect to, so in other words this would be the public IP

ifconfig 10.10.10.85 10.10.10.86

#this is the IP range and subnet mask that the OpenVPN server hands out by DHCP to the remote clients normally this should be your LAN subnet

ifconfig-pool 192.168.1.90 192.168.1.100

# allows other clients to communicate and see each other

client-to-client

#this stuff is related to logging where we write our status and logs to /var/log/openvpn/*

status /var/log/openvpn/openvpn-status.log

log         /var/log/openvpn/openvpn.log

log-append  /var/log/openvpn/openvpn.log

# set verbosity to 6 which shows a lot of helpful info for debugging purposes

verb 6
4.) Start the OpenVPN Server Manually for Testing
The way the service works is based on the conf file name. For example to start the OpenVPN server config in /etc/openvpn/server.conf you could use this: systemctl start openvpn@server
If the config file was named "realtechtalk.conf" then the command would be : systemctl start openvpn@realtechtalk
openvpn /etc/openvpn/server.conf
This is a great way to quickly troubleshoot through config errors so we can see the output live, before relying on the system service (eg. systemctl start openvpn).
5.) Wait, we need to enable IP Forwarding for this to work
Let's use sed to permanently enable it
sed -i 's/#net.ipv4.ip_forward=1/net.ipv4.ip_forward=1/' /etc/sysctl.conf
Let's enable/reread the config from sysctl.conf
sysctl -p
Verify ip_forwarding is enabled:
cat /proc/sys/net/ipv4/ip_forward

1
If using two NICs on the OpenVPN Server you will need to enable proxy_arp for the arp entry to appear on the OpenVPN server.
echo 1 > /proc/sys/net/ipv4/conf/all/proxy_arp
To make it permanent add it to sysctl.conf:
net.ipv4.conf.all.proxy_arp=1
One more important tricky thing to remember!
In a general/real life situation, we would normally set a certain amount of IPs for local and remote hosts to make routing easier.
That is, the VPN server needs to know whether to route traffic to each IP in this range through the tunnel or the LAN. This would normally be done using an init-script on boot or an up-script when OpenVPN server starts.
You should manually create routes for each VPN client IP on the host/OpenVPN Server:
#this rule assumes that .90 is a VPN client IP so we will need to route it through the tunnel
route add 192.168.1.90 dev tun0
#this rule is like a catch all for anything less specific than above, by default other IPs in this range will be routed through the LAN
ip route add 192.168.1.0/24 dev eth0
**Sometimes the above will not work without a lower metric, depending on the defaults of your OS. If you have any issue with the routes above not being prioritized, you can delete the route and readd it using a metric.
eg.
route add 192.168.1.90 dev tun0 metric 0
6.) Generate Client Key
 ./easyrsa build-client-full realtechtalk.com nopass

Using SSL: openssl OpenSSL 1.1.1k  25 Mar 2021

Generating a RSA private key

.....................................................................................+++++

.........................+++++

writing new private key to '/home/areeb/rttCerts/pki/easy-rsa-6698.H3SiHE/tmp.HURHFV'

-----

Using configuration from /home/areeb/rttCerts/pki/easy-rsa-6698.H3SiHE/tmp.gagfhd

Check that the request matches the signature

Signature ok

The Subject's Distinguished Name is as follows

commonName            :ASN.1 12:'realtechtalk.com'

Certificate is to be certified until May 21 21:07:16 2024 GMT (825 days)


Write out database with 1 new entries

Data Base Updated
7.) Connect Client
This is based on the client we created above which was named "realtechtalk.com" so there will be a .crt for the certificate and .key for the private key.
Files required:
- ca.crt
- realtechtalk.com.crt
- realtechtalk.com.key
Manual Example:
Change 10.10.10.11 4443 to your VPN server IP and port. Change the file locations to the locations of your key, certificate and ca
Change --proto tcp-client to --proto udp if you are not using tcp in the command below.
openvpn --pull --tls-client --dev tun --key rttCerts/pki/private/realtechtalk.com.key --cert rttCerts/pki/issued/realtechtalk.com.crt --ca rttCerts/pki/ca.crt --remote 10.10.10.11 4443 --proto tcp-client
Note pull is important otherwise your tunnel (tun0) will NEVER get an IP or any other pushed info like routing, DHCP etc..
How To Generate an OpenVPN Client Config File
We've actually done that above, let's take the example command above and see how each -- parameter is really the same as the config file.
openvpn --pull --tls-client --dev tun --key rttCerts/pki/private/realtechtalk.com.key --cert rttCerts/pki/issued/realtechtalk.com.crt --ca rttCerts/pki/ca.crt --remote 10.10.10.11 4443 --proto tcp-client
Resulting OpenVPN Config
As you can see, all we need was remove the -- from each argument and put it on a separate line to create our config file, which is what you would normally want the user to have. You can take the config below, along the keys and distribute it to your users to use on any OS/device that has the OpenVPN client installed (eg. OpenVPN Connect for Android/IOS) or Windows, Mac etc..
pull

tls-client

dev tun

key rttCerts/pki/private/realtechtalk.com.key

cert rttCerts/pki/issued/realtechtalk.com.crt

ca rttCerts/pki/ca.crt

remote 10.10.10.11 4443

proto tcp-client
One other handy way is if you can do a search and replace for "--" and replace it with "\n" in an advanced text editor and you can automatically translate the original command into a config file.
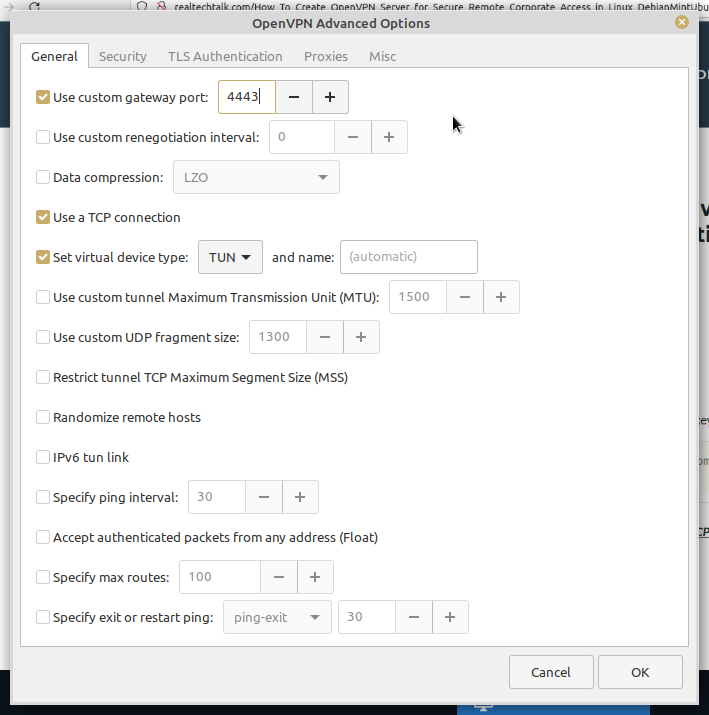
Example using OpenVPN client on Mint 20
.png)
Click on advanced to specify the following things:
Use Custom gateway port: if you have a non-standard port (eg. our example server uses 4443)
Use a TCP connection: if your server is using TCP and not UDP (eg. our example server uses TCP)
Set virtual device type: TUN or TAP (must match what the server uses eg. our example uses TUN)
Errors:
Can't connect to OpenVPN server even though we can ping and telnet to the OpenVPN Server
Bad encapsulated packet length from peer (3338), which must be > 0 and <= 1626 -- please ensure that --tun-mtu or --link-mtu is equal on both peers -- this condition
OpenVPN Cannot Find Keys
Options error: --dh fails with 'dh2048.pem': No such file or directory (errno=2)

Options error: --cert fails with 'server.crt': No such file or directory (errno=2)

Wed Feb 16 19:34:32 2022 us=473559 WARNING: cannot stat file 'server.key': No such file or directory (errno=2)

Options error: --key fails with 'server.key': No such file or directory (errno=2)

Wed Feb 16 19:34:32 2022 us=473638 WARNING: cannot stat file 'ta.key': No such file or directory (errno=2)

Options error: --tls-auth fails with 'ta.key': No such file or directory (errno=2)

Options error: Please correct these errors.

Use --help for more information.
Solution - Make sure your server.conf resides in /etc/openvpn/server.conf and that your keys/certs are in /etc/openvpn
Tags:
openvpn, server, linux, debian, mint, ubuntu, authenticationthis, assumes, define, ip, exclusively, protocol, forwarded, via, router, firewall, segments, lan, routing, firewalling, desirable, nics, install, apt, lists, dependency, additional, packages, installed, rsa, libccid, libglib, libicu, liblzo, libpcsclite, libpkcs, helper, libxml, opensc, pkcs, pcscd, mime, info, xdg, user, dirs, pcmciautils, resolvconf, systemd, resolved, upgraded, newly, mb, archives, disk, http, deb, org, amd, kb, dfsg, fetched, preconfiguring, selecting, previously, unselected, database, directories, currently, preparing, unpack, rsa_, _all, unpacking, libccid_, _amd, _, data_, opensc_, openvpn_, pcscd_, info_, dirs_, schema, ok, restarting, virtual, daemon, symlink, etc, multi, rarr, lib, sockets, socket, processing, triggers, libc, bin, certificates, utilities, commands, creates, directory, quot, rttcerts, generate, cadir, ls, reveals, scripts, rtt, easyrsa, openssl, cnf, vars, init, pki, configuration, ca, requests, dir, dh, diffie, helman, gen, ssl, sep, generating, parameters, generator, pem, nopass, mar, modulus, primes, incorporated, certificate, distinguished, dn, fields, default, eg, realtechtalk, creation, import, cert, publishing, crt, csr, filename, rttrequest, req, llwk, tmp, pxuj, keypair, completed, reqs, accuracy, cryptographically, verified, checksum, sender, commonname, input, abort, safessl, phrase, follows, asn, certified, gmt, entries, updated, issued, cp, configure, newer, distros, config, stored, conf, elements, specs, specifies, specify, tcp, proto, tls, mode, adapter, tun, recommended, advanced, permissions, devices, dev, mtu, ensure, destined, routed, vpn, ifconfig, subnet, dhcp, allows, communicate, logging, logs, var, append, verbosity, debugging, purposes, verb, manually, systemctl, troubleshoot, errors, output, relying, enable, forwarding, sed, permanently, ipv, ip_forward, sysctl, reread, teh, verify, ip_forwarding, enabled, proc, sys, tricky, ips, hosts, routes, areeb, sihe, hurhfv, gagfhd, manual, locations, ping, telnet, encapsulated, packet, length, peer, peers, fails, errno, wed, feb, stat, auth, resides, certs,