
Docker Tutorial HowTo Install Docker, Use and Create Docker Container Images Clustering Swarm Mode Monitoring Service Hosting Provider
The Best Docker Tutorial for Beginners

We quickly explain the basic Docker concepts and show you how to do the most common tasks from starting your first container, to making custom images, a Docker Swarm Cluster Tutorial, docker compose and Docker buildfiles.

What is Docker?
According to the Docker project "Docker helps developers bring their ideas to life by conquering the complexity of app development." -- https://github.com/docker
Docker is meant for businesses and developers alike to efficiently (think faster, safe/more secure, large scale) build software applications and provide services through these applications.
Docker itself has borrowed from the traditional Virtualization layer (eg. Virtuozzo/OpenVZ) to another lower, more simple level in comparison to the already efficient VE/VPS server model. In the VE/VPS model, OS's would run on the same Linux kernel but have a completely separate operating environment, IPs and ability to login as root and configure nearly any service as if it were a physical server (with some minor limitations). This is still possible in Docker but it is not the most common use case, in our opinion.
This abstraction we refer to is based on the fact that Docker itself is not a virtual OS, as much as it can do VEs using the kernel namespaces feature. But with Docker the whole process is more streamlined and automated, namely due to the tools and utilities that Docker has created. Rather than relying on an OS, Docker relies on JUST the files to run the application. For example if you run nginx or Apache in Docker, you don't need to have any other unrelated services or files like you would on a traditional OS. This effectively means that Docker can have almost 0 overhead, even compared to the VE/VPS method which already had very low overhead.
However, we could argue that the VE model while being efficient, still had additional overhead when compared to an Apache or nginx Docker image as an example. If we wanted to have 500 VPSs/VEs running on say Debian 10 to run our web infrastructure, it would normally mean that we would have 500 installs of Debian 10 running. Docker makes this unnecessary and instead you would run multiple Docker containers with an Apache image in order to achieve this. The catch is that running the 500 Docker containers means there is no additonal RAM overhead that an OS would require such as memory and CPU cycles responsible for logging, journaling, and other processes that run in a default Debian.
Commercial Docker Solutions
There are a number of "Commercial Docker Hosting Solutions", Docker hosting providers, who provide this as CaaS (Container as a Service) for those who want to save the time and resources on maintaining and configuring the Docker infrastructure and focus entirely on developing within a preconfigured Docker environment.
For most production users, you will want a provider with a Docker Swarm Cluster for HA and Load Balancing, giving you a nice blend of higher performance and redundancy.
It is important to remember that the average solution is a "shared solution" which means you are sharing the resources of physical servers with likely dozens or hundreds of thousands of users.
For those who need consistent performance you will want a semi-private or completely Dedicated Docker solution with physical servers and networking Dedicated to your organization alone.
Why Docker?
Docker is purpose built for quickly and efficiently building dozens, hundreds or even thousands of applications which are largely preconfigured, whether a minimal Ubuntu for testing or production, or Asterisk, nginx, Apache, there are literally thousands of images maintained by the community. Docker is also very easy to automate whether using Ansible or Docker Compose, whether small or large scale, Docker just makes things easier and faster than the traditional manual or Cloud VM alone method.
Let's see a real life example based on the example in the "What Is Docker?" section where we compare the overhead of VEs/VMs vs a straight httpd image from Docker.
An example of how efficient Docker is (500 Docker Containers vs 500 VMs)
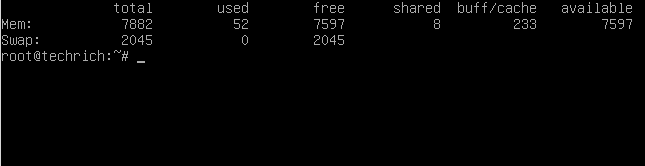
Here's an example of the very lightweight Debian 10 default install running:
Notice that the default OS uses about 823MB of space, and keep in mind that most other Linux OS's would use a lot more.

How about the RAM usage on the same VM?
We haven't even tracked the CPU cycles the OS uses over time but currently we can compare the following:
-
RAM usage
-
Disk usage
In our example we said we would have 500 VMs to run the web infrastructure.
Let's see what the "base/default of Debian 10" would require in terms of disk space and RAM alone:
Traditional default RAM usage = 500 VMs * 52MB of RAM per VM = 26000MB (or almost 26G RAM)
Traditional default disk usage = 500 VMs * 823M of disk space per VM = 411500MB (over 400G of disk space)
Hopefully this example shows how quickly the wasted RAM and disk space can add up, this adds more to your computing/Cloud/Server bills and doesn't even address the extra overhead of CPU cycles for the 500 VMs to be running.
Now there are ways to mitigate this if you have VEs by using things like ksm, but it will still not beat Docker's efficiency.
More here on Docker Efficiency.
What is a Docker Image?
The best way again to compare Docker is to the traditional VE method of OpenVZ. OpenVZ modifies the OS's so they can run within the same kernel space as the host and provide isolation and excellent performance. As a result OpenVZ OS images are EXTREMELY optimized and generally smalelr than even the defaults of the standard/minimal OS install.
Docker does something similar and almost builds off the same concept as OpenVZ, it doesn't aim to virtualize the OS at all, but rather aims to provide JUST the required files/binaries to run a certain application.
For example in Docker we would deploy a container that just has Apache or Nginx running on it. Images are generally created for single and specific purposes, so you can also find images for running MySQL or PostgreSQL etc..
You can see the list of Docker Images on Docker hub here: https://hub.docker.com/
What are Docker Containers Used For Running?
Docker Containers run "Docker Images", as an instance, in a similar concept as we say that a VMWare VM may be running an image of Debian 10 (but keeping in mind again that Docker Images do not containerize the full unmodified OS but just the underlying application alone, normally).
What is Docker Swarm?
Docker Swarm is a mode and what we called the "Clustered/Load Balanced" enabled Docker which allows us to scale, balance and provide some redundancy to our services running on Docker.
It allows you to manage the Docker Cluster, is decentralized, supports scaling by adding or removing tasks based on what you specify as the number of tasks, service discovery by assigning a unique DNS name and auto load balancing, abiliity to incrementally roll updates and roll back if there is an issue, reconcillation by starting new containers to replace dead ones (eg. if you told Docker to run 20 replicas and a server died and took down 5, another 5 would respawn on the available Docker workers in the Swarm/Cluster).
What Is Docker Software?
Docker is the same software tool described in the previous sections, that enables all of the functionality that we have described, namely the images that we run Containers from and the ability to manage and deploy various applications with Docker.
For example in Linux/Ubuntu/Debian the software package that provides the docker software is called "docker-compose"
Docker vs Kubernetes?
We will make a full series on this, but clearly from our examples, we can see that Docker does not have the same level of management, monitoring and ability to automatically scale in the way that Kubernetes does, nor does it have the same level of self-healing properties.
Docker is simple and efficient, can still scale and provide excellent performance and is likely better suited to smaller scale projects where you don't have the entire internet and world accessing them, according to some (this is a highly debated topic).
Where Docker shines is the ease and speed that it can be deployed due to its simplicity. If you don't require the extra features and benefits of running a massive Kubernetes Cluster, and/or you don't have the resources to manage it, you can either outsource your Kubernetes Service, or Docker Service, or rent some servers in order to build your own in-house Docker Swarm.
More here with a Docker Swarm vs Kubernetes Comparison Guide.
Easy How To Tutorial: Install Docker and Run Your First Container
This is based on Ubuntu/Debian/Mint.
1.) Install Docker Compose
Warning that sometimes docker will break iptables NAT/FORWARD, if your NAT stops going out to the internet after installing Docker or your bridged VMs, stopped working, then check this post here.
docker-compose the name of the package that tells our Debian/Mint/Ubuntu to install all of the required files for us to actually use docker including the "docker.io" which gives us the docker binary (technically we could just do apt install docker.io though)
apt install docker-compose
How To Run Docker as non-root user without sudo
On most installs of docker /var/run/docker.sock (docker socket) is owned by user root and group docker. The simplest way is to add your current user to the docker group like below.
Change yourusername with your actual username that you want to run docker as.
usermod -a -G docker yourusername
2.) Docker and the "docker" Binary Command
Note that you cannot just copy the commands below as you don't have any docker container or image, just yet. This is just an overview of the basic management of docker containers. Part #3 is where we actually start creating containers.
Get your first docker container running in 10 seconds:
docker run -it --name realtechtalkTest ubuntu
To exit gracefully remember to hold Ctrl + P + Q
Docker Command Cheatsheet
How To Check all of our RUNNING Containers:
docker ps
CONTAINER ID        IMAGE               COMMAND             CREATED             STATUS              PORTS               NAMES

f422c457dc90        debian              "bash"              19 minutes ago      Up 2 seconds                            realtechtalkDebianTest
How To Check all of our Containers (even the ones not running):
When comparing to the above output, we can now see a container called "realtechtalkCentOS" which says is "Exited" which means it is not running.
docker ps -a

CONTAINER ID        IMAGE               COMMAND             CREATED             STATUS                     PORTS               NAMES

dc2e352fa949        centos              "/bin/bash"         13 minutes ago      Exited (0) 4 minutes ago                       realtechtalkCentOS

f422c457dc90        debian              "bash"              20 minutes ago      Up 32 seconds                                  realtechtalkDebianTest
All flags for checking docker containers:
  -a, --all             Show all containers (default shows just running)

  -f, --filter filter   Filter output based on conditions provided

      --format string   Pretty-print containers using a Go template

  -n, --last int        Show n last created containers (includes all

                        states) (default -1)

  -l, --latest          Show the latest created container (includes all

                        states)

      --no-trunc        Don't truncate output

  -q, --quiet           Only display numeric IDs

  -s, --size            Display total file sizes
Note that the examples below use the containerid (the part in bold) and not the name, although name could be used in place of the ID.
How To Stop A Running Docker Container:
docker stop realtechtalkTest
The last "dc2e352fa949" is the ID of a running container, which is an example from the docker ps -a above which lists all of the container running IDs.
How To Start and Attach To a Docker Container:
docker start -a realtechtalkTest
Does it work as expected? Remember if you start and attach with no -i for interactive terminal, there is no interactive terminal so it won't be as you expect.
Try this and see the difference with a container image like Ubuntu or Debian:
docker start -ai realtechtalkTest
How To Start A Stopped Docker Container:
docker start realtechtalkTest
Replace realtechtalkTest with your Docker containerid or name of container
How To Restart A Running Docker Container:
docker restart realtechtalkTest
How To Remove/Delete Container(s):
docker rm realtechtalkTest
You can pass multiple container IDs by using a space after each one.
docker rm dc2e352fa949 f422c457dc90
How To Attach/Connect to a running container:
docker attach realtechtalkTest
root@f422c457dc90:/# ls

bin  boot  dev    etc  home  lib    lib64  media  mnt  opt    proc  root  run  sbin  srv  sys  tmp  usr  var
What happens if we try to attach a non-running/stopped Container?
docker attach realtechtalkTest
You cannot attach to a stopped container, start it first
List our docker images (on our local machine):
docker image list

REPOSITORY          TAG                 IMAGE ID            CREATED             SIZE

ubuntu              latest              2b4cba85892a        10 days ago         72.8MB

debian              latest              d40157244907        13 days ago         124MB

centos              latest              5d0da3dc9764        5 months ago        231MB
How can we leave, exit detach or disconnect from the console of a container without killing it?
Hitting Ctrl + P and Ctrl + Q in sequence will detach you from the console while leaving the container running. Otherwise the container will normally be killed/stopped if you type exit at the bash prompt of the console.
All Docker Commands:
Commands:
- attach Attach local standard input, output, and error streams to a running container
- build Build an image from a Dockerfile
- commit Create a new image from a container's changes
- cp Copy files/folders between a container and the local filesystem
- create Create a new container
- diff Inspect changes to files or directories on a container's filesystem
- events Get real time events from the server
- exec Run a command in a running container
- export Export a container's filesystem as a tar archive
- history Show the history of an image
- images List images
- import Import the contents from a tarball to create a filesystem image
- info Display system-wide information
- inspect Return low-level information on Docker objects
- kill Kill one or more running containers
- load Load an image from a tar archive or STDIN
- login Log in to a Docker registry
- logout Log out from a Docker registry
- logs Fetch the logs of a container
- pause Pause all processes within one or more containers
- port List port mappings or a specific mapping for the container
- ps List containers
- pull Pull an image or a repository from a registry
- push Push an image or a repository to a registry
- rename Rename a container
- restart Restart one or more containers
- rm Remove one or more containers
- rmi Remove one or more images
- run Run a command in a new container
- save Save one or more images to a tar archive (streamed to STDOUT by default)
- search Search the Docker Hub for images
- start Start one or more stopped containers
- stats Display a live stream of container(s) resource usage statistics
- stop Stop one or more running containers
- tag Create a tag TARGET_IMAGE that refers to SOURCE_IMAGE
- top Display the running processes of a container
- unpause Unpause all processes within one or more containers
- update Update configuration of one or more containers
- version Show the Docker version information
- wait Block until one or more containers stop, then print their exit codes
3.) Create our first "ubuntu" docker container
Let's get the latest version of Ubuntu, it will "pull" (download it) automatically.
docker pull ubuntu
Using default tag: latest

latest: Pulling from library/ubuntu

7c3b88808835: Pull complete

Digest: sha256:8ae9bafbb64f63a50caab98fd3a5e37b3eb837a3e0780b78e5218e63193961f9

Status: Downloaded newer image for ubuntu:latest
But what if we didn't want the latest Debian? Let's say we wanted Debian 10, we can use the tag to get other available versions.
docker pull debian:10

10: Pulling from library/debian

1c9a8b42b578: Pull complete

Digest: sha256:fd510d85d7e0691ca551fe08e8a2516a86c7f24601a940a299b5fe5cdd22c03a

Status: Downloaded newer image for debian:10
Notice that we added a :10 to our pull command, that specifies the tag we want which means another version of that image (eg. Debian 10).
*Remember that the tag feature works the same way in other commands in Docker such as "run" or "create".
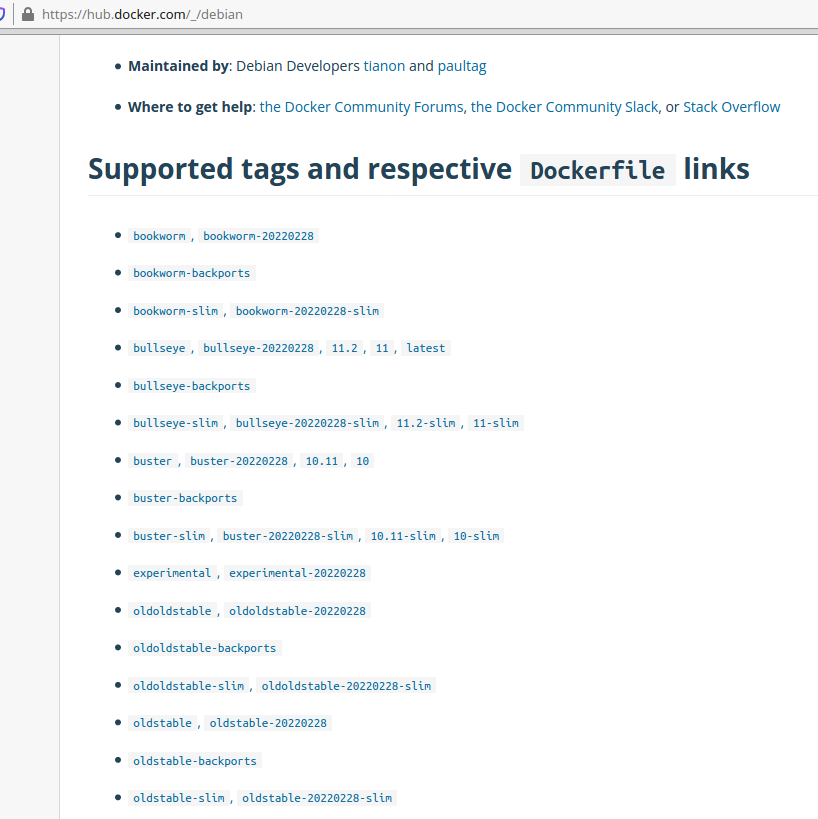
To illustrate this see the example below from the official Debian image on Docker Hub.
Notice that for Debian 10 there are multiple tags that get you the same thing eg we could have used: buster, 10.11, 10, buster-202202228
For example we could have used any of the tags as debian:buster or debian:10.11 etc, they all give you the same Debian 10 image but are different, easy ways that a user can often guess the tag for.
You can also seach for docker images using docker search:
docker search linuxmint

NAME                        DESCRIPTION                                     STARS               OFFICIAL            AUTOMATED

linuxmintd/mint19-amd64     Linux Mint 19 Tara (64-bit)                     7

linuxmintd/mint20-amd64     Linux Mint 20 Ulyana (64-bit)                   7

linuxmintd/mint19.3-amd64   Linux Mint 19.3 Tricia (64-bit)                 7

linuxmintd/mint19.1-amd64   Linux Mint 19.1 Tessa (64-bit)                  3

linuxmintd/mint19.2-amd64   Linux Mint 19.2 Tina (64-bit)                   1

linuxmintd/mint17-amd64     Linux Mint 17.3 Rosa (64-bit)                   1
docker image list
REPOSITORY          TAG                 IMAGE ID            CREATED             SIZE

ubuntu              latest              2b4cba85892a        10 days ago         72.8MB
How can we attach to a container that was created without an interactive terminal?
docker exec -it containername bash
Let's "create" and "run", then start a new container based on the "ubuntu" image we just pulled.
docker run --name realtechtalkDockerImage -it ubuntu
- -i = Interactive Session to STDIN
- -t = allocate pseudo tty
Notice in our examples that run actually pulls the image (if not pulled already), and then creates the container and then runs it. It's a bit of a shortcut if it's out intention to create and run a new container immediately. If you don't want to create and run the container immediately, then you would not use "docker create" instead of "docker run"
Eg. docker create --name realtechtalkDockerImage -it ubuntu
Here are more options that "run" offers:
For example we could set memory limits with "-m 4G" to set a 4G memory limit on the container or set CPU limitations.
You can also do this later on an already running/created container by using "docker update containername -m 4G"
the same applies for the other options below, they can be applied during creation or using docker update, after they have been created.
- --add-host list Add a custom host-to-IP mapping (host:ip)
- -a, --attach list Attach to STDIN, STDOUT or STDERR
- --blkio-weight uint16 Block IO (relative weight), between 10 and 1000, or 0 to disable (default 0)
- --blkio-weight-device list Block IO weight (relative device weight) (default [])
- --cap-add list Add Linux capabilities
- --cap-drop list Drop Linux capabilities
- --cgroup-parent string Optional parent cgroup for the container
- --cidfile string Write the container ID to the file
- --cpu-period int Limit CPU CFS (Completely Fair Scheduler) period
- --cpu-quota int Limit CPU CFS (Completely Fair Scheduler) quota
- --cpu-rt-period int Limit CPU real-time period in microseconds
- --cpu-rt-runtime int Limit CPU real-time runtime in microseconds
- -c, --cpu-shares int CPU shares (relative weight)
- --cpus decimal Number of CPUs
- --cpuset-cpus string CPUs in which to allow execution (0-3, 0,1)
- --cpuset-mems string MEMs in which to allow execution (0-3, 0,1)
- -d, --detach Run container in background and print container ID
- --detach-keys string Override the key sequence for detaching a container
- --device list Add a host device to the container
- --device-cgroup-rule list Add a rule to the cgroup allowed devices list
- --device-read-bps list Limit read rate (bytes per second) from a device (default [])
- --device-read-iops list Limit read rate (IO per second) from a device (default [])
- --device-write-bps list Limit write rate (bytes per second) to a device (default [])
- --device-write-iops list Limit write rate (IO per second) to a device (default [])
- --disable-content-trust Skip image verification (default true)
- --dns list Set custom DNS servers
- --dns-option list Set DNS options
- --dns-search list Set custom DNS search domains
- --entrypoint string Overwrite the default ENTRYPOINT of the image
- -e, --env list Set environment variables
- --env-file list Read in a file of environment variables
- --expose list Expose a port or a range of ports
- --group-add list Add additional groups to join
- --health-cmd string Command to run to check health
- --health-interval duration Time between running the check (ms|s|m|h) (default 0s)
- --health-retries int Consecutive failures needed to report unhealthy
- --health-start-period duration Start period for the container to initialize before starting health-retries countdown (ms|s|m|h)
- (default 0s)
- --health-timeout duration Maximum time to allow one check to run (ms|s|m|h) (default 0s)
- --help Print usage
- -h, --hostname string Container host name
- --init Run an init inside the container that forwards signals and reaps processes
- -i, --interactive Keep STDIN open even if not attached
- --ip string IPv4 address (e.g., 172.30.100.104)
- --ip6 string IPv6 address (e.g., 2001:db8::33)
- --ipc string IPC mode to use
- --isolation string Container isolation technology
- --kernel-memory bytes Kernel memory limit
- -l, --label list Set meta data on a container
- --label-file list Read in a line delimited file of labels
- --link list Add link to another container
- --link-local-ip list Container IPv4/IPv6 link-local addresses
- --log-driver string Logging driver for the container
- --log-opt list Log driver options
- --mac-address string Container MAC address (e.g., 92:d0:c6:0a:29:33)
- -m, --memory bytes Memory limit
- --memory-reservation bytes Memory soft limit
- --memory-swap bytes Swap limit equal to memory plus swap: '-1' to enable unlimited swap
- --memory-swappiness int Tune container memory swappiness (0 to 100) (default -1)
- --mount mount Attach a filesystem mount to the container
- --name string Assign a name to the container
- --network string Connect a container to a network (default "default")
- --network-alias list Add network-scoped alias for the container
- --no-healthcheck Disable any container-specified HEALTHCHECK
- --oom-kill-disable Disable OOM Killer
- --oom-score-adj int Tune host's OOM preferences (-1000 to 1000)
- --pid string PID namespace to use
- --pids-limit int Tune container pids limit (set -1 for unlimited)
- --privileged Give extended privileges to this container
- -p, --publish list Publish a container's port(s) to the host
- -P, --publish-all Publish all exposed ports to random ports
- --read-only Mount the container's root filesystem as read only
- --restart string Restart policy to apply when a container exits (default "no")
- --rm Automatically remove the container when it exits
- --runtime string Runtime to use for this container
- --security-opt list Security Options
- --shm-size bytes Size of /dev/shm
- --sig-proxy Proxy received signals to the process (default true)
- --stop-signal string Signal to stop a container (default "SIGTERM")
- --stop-timeout int Timeout (in seconds) to stop a container
- --storage-opt list Storage driver options for the container
- --sysctl map Sysctl options (default map[])
- --tmpfs list Mount a tmpfs directory
- -t, --tty Allocate a pseudo-TTY
- --ulimit ulimit Ulimit options (default [])
- -u, --user string Username or UID (format:
- --userns string User namespace to use
- --uts string UTS namespace to use
- -v, --volume list Bind mount a volume
- --volume-driver string Optional volume driver for the container
- --volumes-from list Mount volumes from the specified container(s)
- -w, --workdir string Working directory inside the container
But we don't need to have the image manually pulled, let's see what happens if we try ot just "run" a docker container based on the latest Debian image.
--name is the name that we give the Container, it could be anything but should be something meaningful. The "debian" part means to retrieve the image called "debian".
docker run --name realtechtalkDebianTest -it debian bash
Unable to find image 'debian:latest' locally

latest: Pulling from library/debian

e4d61adff207: Pull complete

Digest: sha256:10b622c6cf6daa0a295be74c0e412ed20e10f91ae4c6f3ce6ff0c9c04f77cbf6

Status: Downloaded newer image for debian:latest
It automatically puts us into the bash command line and the user@host is the ID of the Docker container that we just created:
root@f422c457dc90:/#
It looks like a normal bash prompt and OS, but is it really?
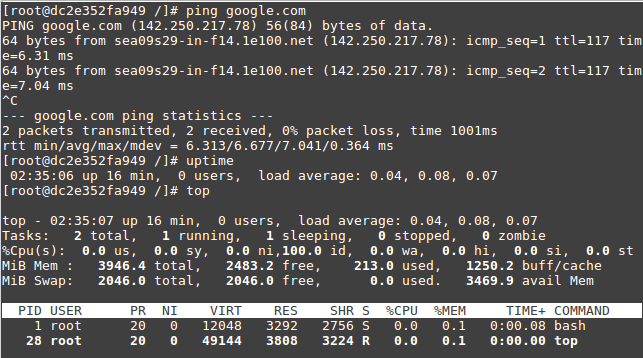
root@f422c457dc90:/# uptime

bash: uptime: command not found

root@f422c457dc90:/# top

bash: top: command not found

root@f422c457dc90:/# ls

bin   dev  home  lib64    mnt  proc  run     srv  tmp  var

boot  etc  lib     media    opt  root  sbin  sys  usr
We can see that it has basically chrooted our local filesystem and other items:
root@f422c457dc90:/# df -h

Filesystem      Size  Used Avail Use% Mounted on

overlay          18G  1.5G   16G   9% /

tmpfs            64M     0   64M   0% /dev

tmpfs           2.0G     0  2.0G   0% /sys/fs/cgroup

/dev/vda1        18G  1.5G   16G   9% /etc/hosts

shm              64M     0   64M   0% /dev/shm

tmpfs           2.0G     0  2.0G   0% /proc/acpi

tmpfs           2.0G     0  2.0G   0% /sys/firmware
This Debian 11 is heavily stripped down at just 135MB
root@f422c457dc90:/# du -hs /

du: cannot access '/proc/17/task/17/fd/4': No such file or directory

du: cannot access '/proc/17/task/17/fdinfo/4': No such file or directory

du: cannot access '/proc/17/fd/3': No such file or directory

du: cannot access '/proc/17/fdinfo/3': No such file or directory

135M    /
We can also see it is from the latest Debian 11:
root@f422c457dc90:/# cat /etc/os-release
PRETTY_NAME="Debian GNU/Linux 11 (bullseye)"
NAME="Debian GNU/Linux"
VERSION_ID="11"
VERSION="11 (bullseye)"
VERSION_CODENAME=bullseye
ID=debian
HOME_URL="https://www.debian.org/"
SUPPORT_URL="https://www.debian.org/support"
BUG_REPORT_URL="https://bugs.debian.org/"
Let's create a new CentOS latest test image:
docker run --name realtechtalkCentOS -it centos
Unable to find image 'centos:latest' locally
latest: Pulling from library/centos
a1d0c7532777: Pull complete
Digest: sha256:a27fd8080b517143cbbbab9dfb7c8571c40d67d534bbdee55bd6c473f432b177
Status: Downloaded newer image for centos:latest
[root@dc2e352fa949 /]#
But this CentOS 8 image is different, it has a lot of "normal" utilities and is less stripped down than the Debian image:
The above all looks normal so is Docker just the same or similar to OpenVZ VEs which are kernel based isolated VMs/OS's?
Let's get an httpd (Apache) Docker Image running in a Container and see what happens....
docker run --name rttApacheTest -it httpd
Unable to find image 'httpd:latest' locally

latest: Pulling from library/httpd

f7a1c6dad281: Pull complete

f18d7c6e023b: Pull complete

bf06bcf4b8a8: Pull complete

4566427976c4: Extracting [===========================>                       ]  13.11MB/24.13MB

4566427976c4: Extracting [================================>                  ]  15.47MB/24.13MB

4566427976c4: Extracting [==================================>                ]  16.52MB/24.13MB

4566427976c4: Pull complete

70a943c2d5bb: Pull complete

Digest: sha256:b7907df5e39a98a087dec5e191e6624854844bc8d0202307428dd90b38c10140

Status: Downloaded newer image for httpd:latest


AH00558: httpd: Could not reliably determine the server's fully qualified domain name, using 172.17.0.2. Set the 'ServerName' directive globally to suppress this message

AH00558: httpd: Could not reliably determine the server's fully qualified domain name, using 172.17.0.2. Set the 'ServerName' directive globally to suppress this message

[Mon Mar 14 03:20:32.260563 2022] [mpm_event:notice] [pid 1:tid 140469949963584] AH00489: Apache/2.4.52 (Unix) configured -- resuming normal operations
[Mon Mar 14 03:20:32.260978 2022] [core:notice] [pid 1:tid 140469949963584] AH00094: Command line: 'httpd -D FOREGROUND'
Hmmm, we are running in the foreground and we can't do anything with the pseudo tty, all we can do is hit Ctrl + C.
After that the container is stopped, maybe we can just reattach and work with the Container?
docker attach 51f7dc473194
[Mon Mar 14 03:26:50.258703 2022] [mpm_event:notice] [pid 1:tid 139755667373376] AH00492: caught SIGWINCH, shutting down gracefully
In the cases of images that won't have a real environment or pseudo tty you don't want the default of "attaching" to the console as you won't be able to do anything.
Here is how we should create the Container with an Image like httpd (another work around is creating with "create" instead of run):
docker run --name testagain -dp 80:80 httpd
We use "-d" for detached which makes things work well. Because we "exposed" the port and mapped the host port to container port 80 (where httpd runs), we can also check Apache is responding properly by visiting our host IP in our browser.
You should see your Docker httpd return this:

How Can We Modify The Existing index.html for httpd?
*Warning that old Docker versions like 18.09 do not work with the httpd image and will exit immediately upon start, even if not running in interactive terminal mode. Upgrade to a new version like 24 in Debian 10,11 etc.. or Ubuntu 20/Mint 20.

If you get the above error it can actually be solved by using an older version of httpd:
On mint 18 just use the tag "2-buster" and it will work OK.
This is more of an exercise of understanding how to work with images, let's run this image and delete it once we're done to look at the filestructure.
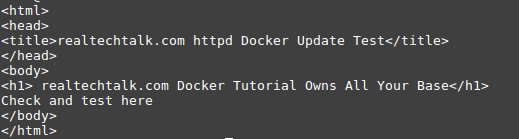
First I created my own index.html in the Docker host:
In our case we know we are looking for index.html, we can do a few things here to get a feel such as ls -al:
We can also just do a find and grep on index.html:
*Note that the --rm means that the container is automatically deleted immediately after running the find command.
docker run --rm httpd find /|grep index.html
As we can see by the output that the default vhost directory is /usr/local/apache2/htdocs
/usr/local/apache2/htdocs/index.html
Make sure that you do find /, if you do find . it is relative to the pwd which would be the home directory of /usr/local/apache2 and would return /htdocs when that is not the right full path.
So now we know that index.html is in /usr/local/apache2/htdocs/, so we can use the docker cp command to copy it there:
*Remember to actually create your own httpd container first and replace the ID below with the ID or name of your httpd container
docker cp index.html 6ecdafe65d6a:/usr/local/apache2/htdocs/
Note that even if we used /htdocs or htdocs as the destination in our copy, it will fail to update and work as expected.
The index.html is the file I created and is assumed to be in the pwd, if not, specify the full absolute path to index.html and the 6ecdafe65d6a is the Container ID we want to copy to and the :/usr/local/apache2/htdocs means we are putting the index.html in that directory (which is where it belongs and is served from in our httpd container).
Did it work? Let's refresh our Apache IP in the browser:

Docker Exposing Ports/Port Mapping
This is required to expose the application/Container to the internet/LAN so outside users can use and connect to it.
IN the previous command for httpd we used the following flag to expose the ports:
-p 80:80
The -p is for "Publish a container's port(s) to the host" and works as follows:
The left side is the host port, and the right side is the container port. In other words the Container port is the port that the app within the container is listening on. It is essentially like a NAT port forward from the host IP's port 80. Keep in mind that ports cannot be shared so if we start another Apache or another process that we want to be accessible by port 80, this is not possible on the same host.
Let's see what happens if we try to create a container that listens on the host port 80:
docker run --name realtechtalkOops -dp 80:80 httpd

b75a3c93db1de6ef11d043707f929d9fad4dd5225c95a12577213eefc4f567db

docker: Error response from daemon: driver failed programming external connectivity on endpoint realtechtalkOops (e2bebce275889561ff07db44fc4b658279d83fd7e0357099943573e2f9cb814f): Bind for 0.0.0.0:80 failed: port is already allocated.
However, we can have unlimited applications running internally on port 80.
See this example here where we used the unused port 8000 on our Docker host and forward it to another Apache running on port 80.
docker run --name anothertestagain -dp 8000:80 httpd

6ecdafe65d6a4190849fdd3676d4278603c51a4e76919a1496f919b0ebb63b04
Notice that we used -p 8000:80 which means we are forwarding host port 8000 to internal port 80 which works since port 8000 on the host is unused.
This works just the same for any Docker container, whether we had port 3306 open for MySQL or 1194 for OpenVPN, we can have unlimited Containers running on the same port, but we cannot have unlimited Containers sharing the same host port.
What if we forget what Container is Mapped to which Port?
docker ps will show us the mapping under PORTS
CONTAINER ID        IMAGE               COMMAND              CREATED             STATUS              PORTS                  NAMES

6ecdafe65d6a        httpd               "httpd-foreground"   15 minutes ago      Up 15 minutes       0.0.0.0:8000->80/tcp   anothertestagain

2ea38a08864b        httpd               "httpd-foreground"   37 minutes ago      Up 37 minutes       0.0.0.0:80->80/tcp     testagain
How To Get Docker Container IP Address
docker inspect containername|grep "IPAddress"

How To Force Kill A Docker Container that is Stuck or Won't Stop
In our case ID 5451e79d8b56 did not like the grep command and hung, so we need to force kill it.
docker ps
CONTAINER ID IMAGE COMMAND CREATED STATUS PORTS NAMES
5451e79d8b56 httpd "grep -r index.html /" About a minute ago Up 59 seconds 80/tcp infallible_khayyam
6ecdafe65d6a httpd "httpd-foreground" 24 minutes ago Up 24 minutes 0.0.0.0:8000->80/tcp anothertestagain
2ea38a08864b httpd "httpd-foreground" About an hour ago Up About an hour 0.0.0.0:80->80/tcp testagain
954924cb201f httpd "httpd-foreground" 4 hours ago Up About an hour 80/tcp rttApache
docker rm 5451e79d8b56
Error response from daemon: You cannot remove a running container 5451e79d8b56fce3db872ad8e221abc612e0d9282aaf7619981c3473b3d61808. Stop the container before attempting removal or force remove
Force remove the hung Container
docker rm 5451e79d8b56 --force
How Do We Create Our Own Docker Image?
Generally the easiest way without reinventing the wheel is to use a pre-existing image whether it is an OS image or httpd, MySQL etc.., you can use any image as your "base", customize it as you need and then save it as a deployable image that you can create Containers from.
Let's take an example of httpd that we just used, by default we just get an "It Works" from the httpd from Docker. What if we wanted the custom index.html to be present by default?
Use the "commit" command to create your custom image!
docker commit anothertestagain realtechtalk_httpd_tag_ondemand
anothertestagain = the name of the running container (found under ps)
realtechtalk_httpd_tag_ondemand = the name of our image that we create
You can add a tag at the same time as committing:
docker commit anothertestagain realtechtalk_httpd_tag_ondemand:yourtag
#otherwise the tag defaults to latest
How To Add The Tag After Committing Already:
The testimage:latest assumes your image name is testimage and has the tag "latest" (the default if you don't choose a tag when committing/creating an image).
The second part testimage:new is the new name of the image and its tag. You can keep the same name and just change the new.
docker tag testimage:latest testimage:new
You can check it under "docker images"
docker images
REPOSITORY                        TAG                 IMAGE ID            CREATED              SIZE

realtechtalk_httpd_tag_ondemand   latest              ef622d9ee2ff        2 seconds ago        144MB
Let's create a new container from our image!
docker run --name rttmodifiedtest -d -p 9000:80 realtechtalk_httpd_tag_ondemand
5ee52fd96411b04726157f7134aff6e519067d5f2d67b08d2888f3b466556230
How Can We Backup Our Image and Restore / Move Our Image To Other Docker Nodes/Machines?
Use "Docker Save" To Backup The Image (all relevant files are taken from /var/lib/docker)
docker save -o rtt.tar realtechtalk_httpd
-o rtt.tar is the name of the output file which we define as "rtt.tar"
Now scp/rsync or move the file to another Docker Node (though we could just scp/rsync/ftp anywhere if we are just doing it for backup purposes):
scp rtt.tar root@10.10.1.250:
rtt.tar 100% 141MB 49.0MB/s 00:02
Now use ssh to execute the restore command on the remote Docker node (you could also run it directly on the node):
ssh root@10.10.1.250 "docker load -i rtt.tar"
docker load -i rtt.tar means to import the file "rtt.tar" into our local images to be used by our Docker node.
We can see it was successful by noting the imported image in our list now:
Loaded image: realtechtalk_httpd:latest
Docker Bind Mount Volumes
Docker bind volume mounts are a quick and efficient way to just give access to host node data. For example, did you need to quickly share some files over httpd? Try this:
docker run -v /path/to/some/public/stuff/:/usr/local/apache2/htdocs --name areebapache -dit -p 80:80 httpd
Note that all paths MUST be absolute. If you specify a relative path for the source (eg. just "stuff"), you'll find the bind mount will be empty in the container.
You cannot add a volume to an existing container.
What this does is expose port 80 on the node IP and gives access to whatever is in the host node /path/to/some/public/stuff by mounting it inside the container at /usr/local/apache2/htdocs.
Obviously you can adjust to your needs and this could be done for mysql/mariadb and any other application.
Docker Volumes
Docker volume management commands:
Usage: docker volume COMMAND
Manage volumes
Commands:
create Create a volume
inspect Display detailed information on one or more volumes
ls List volumes
prune Remove all unused local volumes
rm Remove one or more volumes
Traditional Docker volumes are the more preferred, long-term methods.
How to create a Docker Volume
docker volume create areebtestvol
How to list Docker Volumes
docker volume ls
DRIVER VOLUME NAME
local areebtestvol
local d96e17db67adbda22f832ca8410779f924cf03f703795027307ff2d51d619fbc
local testingareeb
How do use a Docker volume
You use the --mount option and the source= is where you specify a volume that exists. The destination is where it gets mounted to.
docker run --mount source=areebtestvol,destination=/usr/local/apache2/htdocs httpd
The physical location of the data resides here: /var/lib/docker/volumes/areebtestvol/_data
Docker Registry
We can add our custom image above to a private docker registry that is local so we can push it out without using the Docker Hub.
First let's create our registry container and publish it on port 5000 in our Cluster
docker service create --name registry --publish 5000:5000 registry:2
Let's tag our registry into a custom image:
docker tag customimage:new yourIPaddressOrDomain:5000/customimage
Do you need an insecure registry?
This is only recommended for testing and is NOT secure or safe.
create this file: /etc/docker/daemon.json
add this (change to the hostname or IP your registry should be accessible on
{

  "insecure-registries" : ["YourIPAddressOrDomain:5000"]

}
You will not be able to push or pull from the registry unless you create valid SSL certs:
Source: https://docs.docker.com/registry/deploying/
Docker swarm Clustering HA/Load Balancing With Docker HowTo
Our example will use the minimum recommended amount of nodes. Each node could represent a separate VM or physical server, it doesn't matter as long as each one is a separate Docker install (at least for our testing for now).
This assumes that the "docker" binary is installed and working on all 3 machines already.
We will have 3 machines in our swarm:
- Docker Cluster Manager 192.168.1.249
- Docker Worker 01 192.168.1.250
- Docker Worker 02 192.168.1.251
1.) Create A Docker swarm
On our "Docker Cluster Manager":
docker swarm init --advertise-addr 192.168.1.249

Swarm initialized: current node (glmv7jqmwuo5fk3221ohigd94) is now a manager.


To add a worker to this swarm, run the following command:


    docker swarm join --token SWMTKN-1-4frt4od8te0oszxbl7gs27xyhb1q1erf308torchlf50smv3hm-avt1crisvgtwb8lssqt0rxlx1 192.168.1.249:2377


To add a manager to this swarm, run 'docker swarm join-token manager' and follow the instructions.

As we can see above, the swarm is now created just like that and we are given a join command with a token and the IP and port of our Docker swarm manager that the clients/workers will use to join.
On our Docker Worker 01 and Docker Worker 02:
docker swarm join --token SWMTKN-1-4frt4od8te0oszxbl7gs27xyhb1q1erf308torchlf50smv3hm-avt1crisvgtwb8lssqt0rxlx1 192.168.1.249:2377


How can we get / create a token for the Swarm to add a new Worker or Manager later on?
docker swarm join-token manager
docker swarm join-token worker
Check out our swarm!
By running "docker info" on the manager or a worker, you can see info about the cluster.
Here is the output from the manager:
The output tells us the NodeID, how many managers we have and how many nodes we have including the manager and other useful info.
Swarm: active

 NodeID: glmv7jqmwuo5fk3221ohigd94

 Is Manager: true

 ClusterID: lnstbluv1b5j2xq5i5ctq4wji

 Managers: 1

 Nodes: 3

 Default Address Pool: 10.0.0.0/8

 SubnetSize: 24

 Orchestration:

  Task History Retention Limit: 5

 Raft:

  Snapshot Interval: 10000

  Number of Old Snapshots to Retain: 0

  Heartbeat Tick: 1

  Election Tick: 10

 Dispatcher:

  Heartbeat Period: 5 seconds

 CA Configuration:

  Expiry Duration: 3 months

  Force Rotate: 0

 Autolock Managers: false

 Root Rotation In Progress: false

 Node Address: 192.168.1.249

 Manager Addresses:

  192.168.1.249:2377
Here is the output from a worker node:
Swarm: active

 NodeID: zbbmv3x7mg3aptsdigg3rkr9s

 Is Manager: false

 Node Address: 192.168.1.251

 Manager Addresses:

  192.168.1.249:2377
Create Our First Docker swarm Enabled Container
One caveat about Swarm services is that they MUST run a command, where some images like debian:10 contain no normal entry point. This means you must tell some images to run a command when creating a service or you will get this error:
verify: Detected task failure
docker service create debian:10

jsgf862gvv4pu0ah6iqwmliau

overall progress: 0 out of 1 tasks

overall progress: 0 out of 1 tasks

overall progress: 0 out of 1 tasks

1/1: ready     [======================================>            ]


overall progress: 0 out of 1 tasks

1/1: ready     [======================================>            ]

verify: Detected task failure
Now see that it works if we tell the service to run bash:
docker service create -t debian:10 bash

xwlwtv5og89yimir7nika7ght

overall progress: 1 out of 1 tasks

1/1: running   [==================================================>]

verify: Service converged
Other mistakes with Docker Swarm
Make sure you pass options in the right order. For example you cannot do something like this:
docker service create --name RTTRedis redis:5 --replicas 5
Options like --replicas MUST be placed after --create but BEFORE the image name at the end, otherwise you'll have issues like this:
docker service create --name hellothere redis:5 --replicas=20

pypzlishkgveu85s65wspcsyd

overall progress: 0 out of 1 tasks

1/1: ready     [======================================>            ]

verify: Detected task failure
docker swarm logs rtttest
rtttest.1.smw3sa0oa3a8@dockertest01    | *** FATAL CONFIG FILE ERROR ***

rtttest.1.smw3sa0oa3a8@dockertest01    | Reading the configuration file, at line 2

rtttest.1.fyqgobatkzs9@Dockertest02    |

rtttest.1.fyqgobatkzs9@Dockertest02    | *** FATAL CONFIG FILE ERROR ***

rtttest.1.fyqgobatkzs9@Dockertest02    | Reading the configuration file, at line 2

rtttest.1.fyqgobatkzs9@Dockertest02    | >>> 'replicas=4'

rtttest.1.fyqgobatkzs9@Dockertest02    | Bad directive or wrong number of arguments

rtttest.1.yrbnnycrj41u@dockertest03    |

rtttest.1.hxqu276tnpux@dockertest03    |

rtttest.1.hxqu276tnpux@dockertest03    | *** FATAL CONFIG FILE ERROR ***

rtttest.1.yrbnnycrj41u@dockertest03    | *** FATAL CONFIG FILE ERROR ***

rtttest.1.yrbnnycrj41u@dockertest03    | Reading the configuration file, at line 2

rtttest.1.hxqu276tnpux@dockertest03    | Reading the configuration file, at line 2

rtttest.1.hxqu276tnpux@dockertest03    | >>> 'replicas=4'

rtttest.1.yrbnnycrj41u@dockertest03    | >>> 'replicas=4'

rtttest.1.yrbnnycrj41u@dockertest03    | Bad directive or wrong number of arguments

rtttest.1.hxqu276tnpux@dockertest03    | Bad directive or wrong number of arguments

rtttest.1.smw3sa0oa3a8@dockertest01    | >>> 'replicas=4'

rtttest.1.smw3sa0oa3a8@dockertest01    | Bad directive or wrong number of arguments
But we didn't tell you which node, does it matter?
docker service create --replicas 1 --name rttDockerswarmTest debian:10

Error response from daemon: This node is not a swarm manager. Worker nodes can't be used to view or modify cluster state. Please run this command on a manager node or promote the current node to a manager.
Oops, we used a non-manager node and the output is helpful enough to remind us that this MUST be done on a Manager node, so let's try that:
So far it looks a bit different than a single node Docker when we created a Container right?
docker service create --replicas=1 --name debtestafaa debian:10 ping 8.8.8.8

ls00macgf007kfk7ttzfh5153

overall progress: 1 out of 1 tasks

1/1: running   [==================================================>]

verify: Service converged
We also could have passed --publish to expose a port
docker service create --replicas=1 --name httpdtest --publish 9000:80 httpd
This forwards port 9000 to container port 80
How do we attach ourselves to the console of a Docker swarm Container?
docker exec -it 48804a31925d bash
Just replace 48804a31925d with the ID of the container.
How to Check/inspect our running Docker swarm service containers
docker service ls

ID                  NAME                 MODE                REPLICAS            IMAGE               PORTS

wcdj4knlv0yh        rttDockerswarmTest   replicated          1/1                 debian:10

iir15olzazgd        rttapachetest        replicated          1/1                 httpd:latest
For detailed info on our "rttapachetest" httpd server we type this:
--pretty disables the default JSON output.
docker service inspect rttapachetest --pretty


ID:        iir15olzazgdztat3irswyq78

Name:        rttapachetest

Service Mode:    Replicated

 Replicas:    1

Placement:

UpdateConfig:

 Parallelism:    1

 On failure:    pause

 Monitoring Period: 5s

 Max failure ratio: 0

 Update order:      stop-first

RollbackConfig:

 Parallelism:    1

 On failure:    pause

 Monitoring Period: 5s

 Max failure ratio: 0

 Rollback order:    stop-first

ContainerSpec:

 Image:        httpd:latest@sha256:73496cbfc473872dd185154a3b96faa4407d773e893c6a7b9d8f977c331bc45d

 Init:        false

Resources:

Endpoint Mode:    vip
Check what Docker nodes are running our service:
docker service ps rttapachetest

ID                  NAME                IMAGE               NODE                          DESIRED STATE       CURRENT STATE           ERROR               PORTS

w6n5vg0tsorx        rttapachetest.1     httpd:latest        realtchtalk-docker-worker01   Running             Running 7 minutes ago
You can run "docker ps" on each individual node to find out what each one is running:
docker ps

CONTAINER ID        IMAGE               COMMAND              CREATED             STATUS              PORTS               NAMES

a668267b1497        httpd:latest        "httpd-foreground"   About an hour ago   Up About an hour    80/tcp              rttapachetest.1.w6n5vg0tsorxl0xqiyxgvp7p8
How To "Scale Up" our Docker Service Container
By default our service had 1 replica or instance. Let's change that to add 4 more, for a total of 5.
docker service scale rttapachetest=5
rttapachetest scaled to 5
overall progress: 2 out of 5 tasks
1/5: preparing [=================================> ]
2/5: running [==================================================>]
3/5: preparing [=================================> ]
4/5: preparing [=================================> ]
5/5: running [==================================================>]
Watch it complete:
rttapachetest scaled to 5
overall progress: 2 out of 5 tasks
overall progress: 2 out of 5 tasks
overall progress: 2 out of 5 tasks
overall progress: 5 out of 5 tasks
1/5: running [==================================================>]
2/5: running [==================================================>]
3/5: running [==================================================>]
4/5: running [==================================================>]
5/5: running [==================================================>]
verify: Service converged
Other Changes To Container:
We use --publish-add as -p often doesn't work for services and forward host port 8000 to container port 80 for the service called testhttpd. Effectively this means all replicas are now available on port 8000.
docker service update --publish-add 8000:80 testhttpd


overall progress: 10 out of 10 tasks

1/10: running   [==================================================>]

2/10: running   [==================================================>]

3/10: running   [==================================================>]

4/10: running   [==================================================>]

5/10: running   [==================================================>]

6/10: running   [==================================================>]

7/10: running   [==================================================>]

8/10: running   [==================================================>]

9/10: running   [==================================================>]

10/10: running   [==================================================>]
Inspect the difference with docker info on the swarm master:
docker service ps rttapachetest

ID                  NAME                IMAGE               NODE                                DESIRED STATE       CURRENT STATE                ERROR               PORTS

w6n5vg0tsorx        rttapachetest.1     httpd:latest        realtchtalk-docker-worker01         Running             Running 3 hours ago

cticxqmgsuxa        rttapachetest.2     httpd:latest        realtechtalk-docker-worker02        Running             Running about a minute ago

4hrwjpfc57kd        rttapachetest.3     httpd:latest        realtechtalk-docker-worker02        Running             Running about a minute ago

2xhboy2xwo3s        rttapachetest.4     httpd:latest        realtechtalk-docker-swarm-manager   Running             Running 2 minutes ago

3tb75l0rsa43        rttapachetest.5     httpd:latest        realtchtalk-docker-worker01         Running             Running 2 minutes ago
We can see above that it auto-scaled by putting 2 replicas on the worker nodes and 1 on the master node.
How To Update Docker Swarm Services Memory and other Options
The commands are different than for services that are running locally. For example -m 4G would set a memory limit of 4G on a local container but this does not work for a Swarm service.
You could do this for a docker swarm container service:
docker service update ServiceName --limit-memory 4G
overall progress: 0 out of 1 tasks

overall progress: 0 out of 1 tasks

overall progress: 1 out of 1 tasks

1/1: running   [==================================================>]

verify: Service converged
You can see the rest of the update options below that are applicable to Docker Swarm services/containers:
Options:
--args command Service command args
--cap-add list Add Linux capabilities
--cap-drop list Drop Linux capabilities
--config-add config Add or update a config file on a service
--config-rm list Remove a configuration file
--constraint-add list Add or update a placement constraint
--constraint-rm list Remove a constraint
--container-label-add list Add or update a container label
--container-label-rm list Remove a container label by its key
--credential-spec credential-spec Credential spec for managed service account (Windows only)
-d, --detach Exit immediately instead of waiting for the service to converge
--dns-add list Add or update a custom DNS server
--dns-option-add list Add or update a DNS option
--dns-option-rm list Remove a DNS option
--dns-rm list Remove a custom DNS server
--dns-search-add list Add or update a custom DNS search domain
--dns-search-rm list Remove a DNS search domain
--endpoint-mode string Endpoint mode (vip or dnsrr)
--entrypoint command Overwrite the default ENTRYPOINT of the image
--env-add list Add or update an environment variable
--env-rm list Remove an environment variable
--force Force update even if no changes require it
--generic-resource-add list Add a Generic resource
--generic-resource-rm list Remove a Generic resource
--group-add list Add an additional supplementary user group to the container
--group-rm list Remove a previously added supplementary user group from the container
--health-cmd string Command to run to check health
--health-interval duration Time between running the check (ms|s|m|h)
--health-retries int Consecutive failures needed to report unhealthy
--health-start-period duration Start period for the container to initialize before counting retries towards unstable (ms|s|m|h)
--health-timeout duration Maximum time to allow one check to run (ms|s|m|h)
--host-add list Add a custom host-to-IP mapping (host:ip)
--host-rm list Remove a custom host-to-IP mapping (host:ip)
--hostname string Container hostname
--image string Service image tag
--init Use an init inside each service container to forward signals and reap processes
--isolation string Service container isolation mode
--label-add list Add or update a service label
--label-rm list Remove a label by its key
--limit-cpu decimal Limit CPUs
--limit-memory bytes Limit Memory
--limit-pids int Limit maximum number of processes (default 0 = unlimited)
--log-driver string Logging driver for service
--log-opt list Logging driver options
--max-concurrent uint Number of job tasks to run concurrently (default equal to --replicas)
--mount-add mount Add or update a mount on a service
--mount-rm list Remove a mount by its target path
--network-add network Add a network
--network-rm list Remove a network
--no-healthcheck Disable any container-specified HEALTHCHECK
--no-resolve-image Do not query the registry to resolve image digest and supported platforms
--placement-pref-add pref Add a placement preference
--placement-pref-rm pref Remove a placement preference
--publish-add port Add or update a published port
--publish-rm port Remove a published port by its target port
-q, --quiet Suppress progress output
--read-only Mount the container's root filesystem as read only
--replicas uint Number of tasks
--replicas-max-per-node uint Maximum number of tasks per node (default 0 = unlimited)
--reserve-cpu decimal Reserve CPUs
--reserve-memory bytes Reserve Memory
--restart-condition string Restart when condition is met ("none"|"on-failure"|"any")
--restart-delay duration Delay between restart attempts (ns|us|ms|s|m|h)
--restart-max-attempts uint Maximum number of restarts before giving up
--restart-window duration Window used to evaluate the restart policy (ns|us|ms|s|m|h)
--rollback Rollback to previous specification
--rollback-delay duration Delay between task rollbacks (ns|us|ms|s|m|h)
--rollback-failure-action string Action on rollback failure ("pause"|"continue")
--rollback-max-failure-ratio float Failure rate to tolerate during a rollback
--rollback-monitor duration Duration after each task rollback to monitor for failure (ns|us|ms|s|m|h)
--rollback-order string Rollback order ("start-first"|"stop-first")
--rollback-parallelism uint Maximum number of tasks rolled back simultaneously (0 to roll back all at once)
--secret-add secret Add or update a secret on a service
--secret-rm list Remove a secret
--stop-grace-period duration Time to wait before force killing a container (ns|us|ms|s|m|h)
--stop-signal string Signal to stop the container
--sysctl-add list Add or update a Sysctl option
--sysctl-rm list Remove a Sysctl option
-t, --tty Allocate a pseudo-TTY
--ulimit-add ulimit Add or update a ulimit option (default [])
--ulimit-rm list Remove a ulimit option
--update-delay duration Delay between updates (ns|us|ms|s|m|h)
--update-failure-action string Action on update failure ("pause"|"continue"|"rollback")
--update-max-failure-ratio float Failure rate to tolerate during an update
--update-monitor duration Duration after each task update to monitor for failure (ns|us|ms|s|m|h)
--update-order string Update order ("start-first"|"stop-first")
--update-parallelism uint Maximum number of tasks updated simultaneously (0 to update all at once)
-u, --user string Username or UID (format:
How To Delete a Docker swarm Service Container
docker service rm rttapachetest
We can now see the service is gone:
docker service ls

ID                  NAME                 MODE                REPLICAS            IMAGE               PORTS
Docker Advanced Capabilities/Permissions
If you want to create a ramdisk or mount anything, you cannot unless you have privileged mode. This is generally insecure but if used for testing or a single user environment or development, this can be handy.
Here is an example of running a privileged container:
--privileged gives us essentially superuser/root mode in the container
docker run --privileged -it debian:10
For more finegrained control you can --cap-add.
See Docker's list of all options for --cap-add here.
Troubleshooting Docker Solutions
Docker Frozen/Won't Restart Solution
ps aux|grep docker

root     12096  0.0  0.2 848564 11092 ?        Sl   04:45   0:00 docker-containerd-shim -namespace moby -workdir /var/lib/docker/containerd/daemon/io.containerd.runtime.v1.linux/moby/8e322ce07904205e0407157574dc81d30e86fee1501d820996a15e272228eb6b -address /var/run/docker/containerd/containerd.sock -containerd-binary /usr/bin/docker-containerd -runtime-root /var/run/docker/runtime-runc

root     12113  0.0  0.2 848564 10568 ?        Sl   04:45   0:00 docker-containerd-shim -namespace moby -workdir /var/lib/docker/containerd/daemon/io.containerd.runtime.v1.linux/moby/b3469d6679a8d422b4edab071524cb2bd9ca175b8aef88d41e0dba4a0030be3d -address /var/run/docker/containerd/containerd.sock -containerd-binary /usr/bin/docker-containerd -runtime-root /var/run/docker/runtime-runc

root     12991  0.0  0.2 848564  8232 ?        Sl   04:45   0:00 docker-containerd-shim -namespace moby -workdir /var/lib/docker/containerd/daemon/io.containerd.runtime.v1.linux/moby/7168f82db99f72baf2e65927d0daf39336b11aadf6c1caf806858f0a3190d765 -address /var/run/docker/containerd/containerd.sock -containerd-binary /usr/bin/docker-containerd -runtime-root /var/run/docker/runtime-runc

root     12995  0.0  0.2 774832  8928 ?        Sl   04:45   0:00 docker-containerd-shim -namespace moby -workdir /var/lib/docker/containerd/daemon/io.containerd.runtime.v1.linux/moby/5f37fe9459596302b6201aa6873255ede4b1ff55452d5d2f660dfc56831c0408 -address /var/run/docker/containerd/containerd.sock -containerd-binary /usr/bin/docker-containerd -runtime-root /var/run/docker/runtime-runc

root     13047  0.0  0.2 774832  8976 ?        Sl   04:45   0:00 docker-containerd-shim -namespace moby -workdir /var/lib/docker/containerd/daemon/io.containerd.runtime.v1.linux/moby/f3a2c7da2284ae0fa307b62ce2aa9238332e3b299689518c37bbb5be134b3684 -address /var/run/docker/containerd/containerd.sock -containerd-binary /usr/bin/docker-containerd -runtime-root /var/run/docker/runtime-runc

root     15855  0.0  0.3 773424 13044 ?        Sl   04:46   0:00 docker-containerd-shim -namespace moby -workdir /var/lib/docker/containerd/daemon/io.containerd.runtime.v1.linux/moby/d3746ba800f9422f1050118d793c1d20f81867bdb0c0d5f2530677cad2ec976b -address /var/run/docker/containerd/containerd.sock -containerd-binary /usr/bin/docker-containerd -runtime-root /var/run/docker/runtime-runc

root     15871  0.0  0.2 848564 10484 ?        Sl   04:46   0:00 docker-containerd-shim -namespace moby -workdir /var/lib/docker/containerd/daemon/io.containerd.runtime.v1.linux/moby/906ea24e82129b9caf72cd18ad91bd97f76d51ed08319209dee1025fbd93724e -address /var/run/docker/containerd/containerd.sock -containerd-binary /usr/bin/docker-containerd -runtime-root /var/run/docker/runtime-runc
This is a last resort but you can do this:
killall -9 dockerd
killall -9 docker-containerd-shim
Now restart docker: systemctl restart docker
Docker Stops/Crashes
Docker is working/was working and you didn't stop it but you find that it has disappeared:
docker service create --name rtttest openvpn --replicas=2
Cannot connect to the Docker daemon at unix:///var/run/docker.sock. Is the docker daemon running?
Log file reveals:
dockerd[13250]: #011/build/docker.io-sMo5uP/docker.io-18.09.1+dfsg1/.gopath/src/github.com/docker/swarmkit/agent/task.go:122 +0xeb5
systemd[1]: docker.service: Main process exited, code=exited, status=2/INVALIDARGUMENT
systemd[1]: docker.service: Failed with result 'exit-code'.
systemd[1]: docker.service: Service RestartSec=100ms expired, scheduling restart.
systemd[1]: docker.service: Scheduled restart job, restart counter is at 6.
systemd[1]: Stopped Docker Application Container Engine.
systemd[1]: docker.socket: Succeeded.
systemd[1]: Closed Docker Socket for the API.
systemd[1]: Stopping Docker Socket for the API.
systemd[1]: Starting Docker Socket for the API.
systemd[1]: Listening on Docker Socket for the API.
systemd[1]: docker.service: Start request repeated too quickly.
systemd[1]: docker.service: Failed with result 'exit-code'.
systemd[1]: Failed to start Docker Application Container Engine.
systemd[1]: docker.socket: Failed with result 'service-start-limit-hit'.
Docker Container Cannot Run/Start
docker run --name alaleeeido debian:10
time="2022-10-11T20:08:46.411626432Z" level=info msg="starting signal loop" namespace=moby path=/run/containerd/io.containerd.runtime.v2.task/moby/bc677970919920bc51f0458b1b97614d294dc0a2ba3ab81d4f537b74897e0103 pid=6837
INFO[2022-10-11T20:08:46.473856282Z] shim disconnected id=bc677970919920bc51f0458b1b97614d294dc0a2ba3ab81d4f537b74897e0103
WARN[2022-10-11T20:08:46.474007384Z] cleaning up after shim disconnected id=bc677970919920bc51f0458b1b97614d294dc0a2ba3ab81d4f537b74897e0103 namespace=moby
INFO[2022-10-11T20:08:46.474057998Z] cleaning up dead shim
WARN[2022-10-11T20:08:46.496195144Z] cleanup warnings time="2022-10-11T20:08:46Z" level=info msg="starting signal loop" namespace=moby pid=6859
ERRO[2022-10-11T20:08:46.496761530Z] copy shim log error="read /proc/self/fd/15: file already closed"
ERRO[2022-10-11T20:08:46.497695630Z] stream copy error: reading from a closed fifo
ERRO[2022-10-11T20:08:46.497951450Z] stream copy error: reading from a closed fifo
ERRO[2022-10-11T20:08:46.562801575Z] bc677970919920bc51f0458b1b97614d294dc0a2ba3ab81d4f537b74897e0103 cleanup: failed to delete container from containerd: no such container
ERRO[2022-10-11T20:08:46.562875496Z] Handler for POST /v1.41/containers/bc677970919920bc51f0458b1b97614d294dc0a2ba3ab81d4f537b74897e0103/start returned error: failed to create shim: OCI runtime create failed: container_linux.go:380: starting container process caused: process_linux.go:393: copying bootstrap data to pipe caused: write init-p: broken pipe: unknown
docker: Error response from daemon: failed to create shim: OCI runtime create failed: container_linux.go:380: starting container process caused: process_linux.go:393: copying bootstrap data to pipe caused: write init-p: broken pipe: unknown.
ERRO[0000] error waiting for container: context canceled
Docker Push Timeout
docker push localhost:5000/realtechtalk_httpd_tag_ondemand
Get http://localhost:5000/v2/: net/http: request canceled (Client.Timeout exceeded while awaiting headers)
Log output:
"Not continuing with push after error: Get https://localhost:5000/v2/: net/http: TLS handshake timeout"
Docker Compose Quick Guide for Wordpress
We have an example from the Docker Docs, but what's wrong with this?
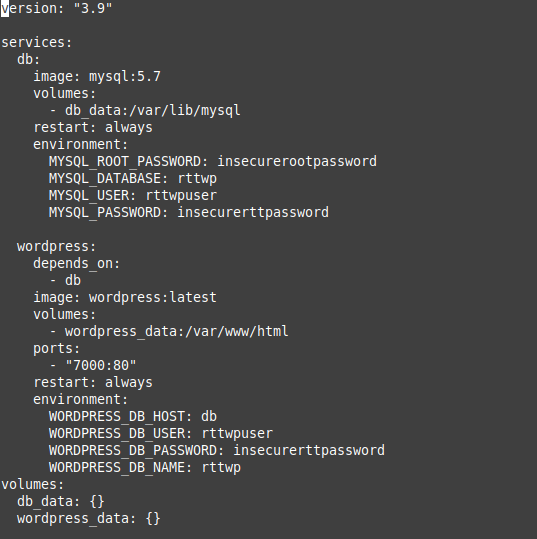
services:
  db:
    image: mysql:5.7
    volumes:
      - db_data:/var/lib/mysql
    restart: always
    environment:
      MYSQL_ROOT_PASSWORD: insecurerootpassword
      MYSQL_DATABASE: rttwp
      MYSQL_USER: rttwpuser
      MYSQL_PASSWORD: insecurerttpassword

  wordpress:
    depends_on:
      - db
    image: wordpress:latest
    volumes:
      - wordpress_data:/var/www/html
    ports:
      - "7001:80"
    restart: always
    environment:
      WORDPRESS_DB_HOST: db
      WORDPRESS_DB_USER: rttwpuser
      WORDPRESS_DB_PASSWORD: insecurerttpassword
      WORDPRESS_DB_NAME: rttwp
volumes:
  db_data: {}
  wordpress_data: {}
How does this work?
1. We specify the environment variables for Wordpress which are then accessed by the wp-config.php file as we'll show below as we explore the live wordpress container below.
2. It uses the getenv_docker environment variables which we specified in our docker compose file above.
3. Also note that when you type export at the shell, it has those environment variables set, as a result of our Docker compose.
4. Finally I ping the "db" host and we find it automatically resolves to the IP of the Mysql container which is handled by the docker-compose internal DNS server: 127.0.0.11
root@0ff71ab1d7e0:/var/www/html# cat /etc/resolv.conf

nameserver 127.0.0.11

Notice the "volumes" section that mentions db_data: and wordpress_data: this creates the two volumes. You can see this by doing docker volume ls: These volumes are persistent and we tell them to mount on /var/www/html for wordpress_data in our docker-compose wordpress image and for our mysql we tell it to mount in /var/lib/mysql. This ensures that even if we delete the containers that the website files and database for Wordpress is preserved.
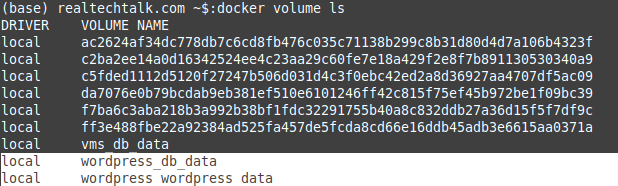
The data itself is stored in /var/lib/docker/volumes as we can see below:

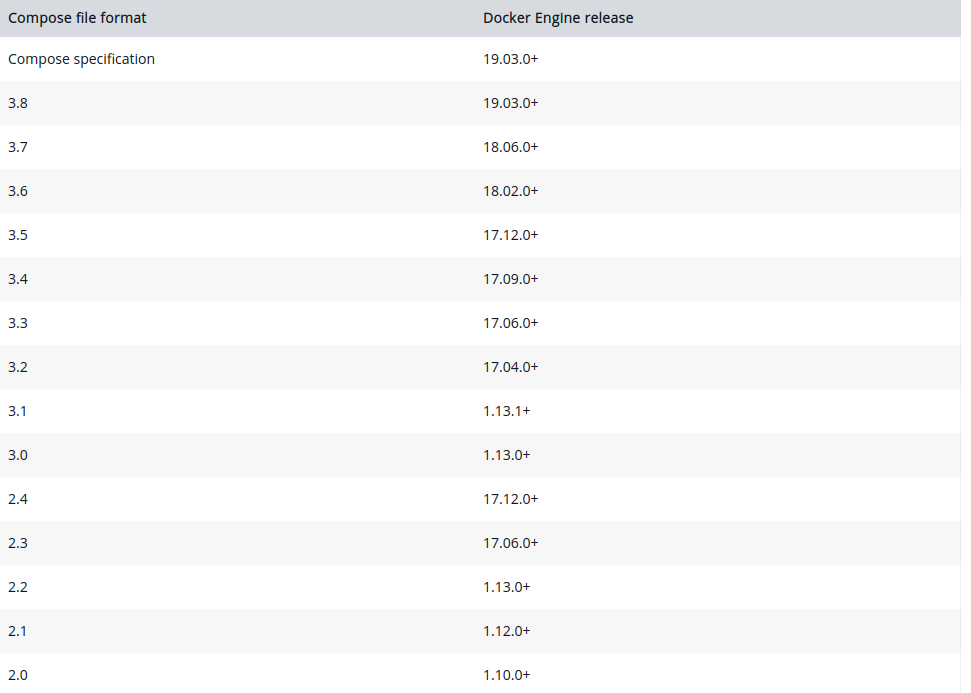
ERROR: Version in "./docker-compose.yml" is unsupported. You might be seeing this error because you're using the wrong Compose file version. Either specify a supported version (e.g "2.2" or "3.3") and place your service definitions under the `services` key, or omit the `version` key and place your service definitions at the root of the file to use version 1.

For more on the Compose file format versions, see https://docs.docker.com/compose/compose-file/
The solution is to check the following table for the Docker Compose format specs vs the Docker Engine, to find wihch Version is supported and works.
Check your docker.io version:
docker --version

Docker version 20.10.7, build 20.10.7-0ubuntu5~20.04.2
In our case we can see 3.8, 3.7 etc.. should work fine so change the "Version: 3.9" in the docker-compose.yml file to this:
Note that a lot of implementations do not seem to support version 3.8 (at least 20.10.7 in Debian/Ubuntu do not) even if you have Docker version 20.10.7 which is supported by version 19.03.0 and up according to the Docker docs.
version: "3.7"
https://docs.docker.com/compose/compose-file/
Run it again: 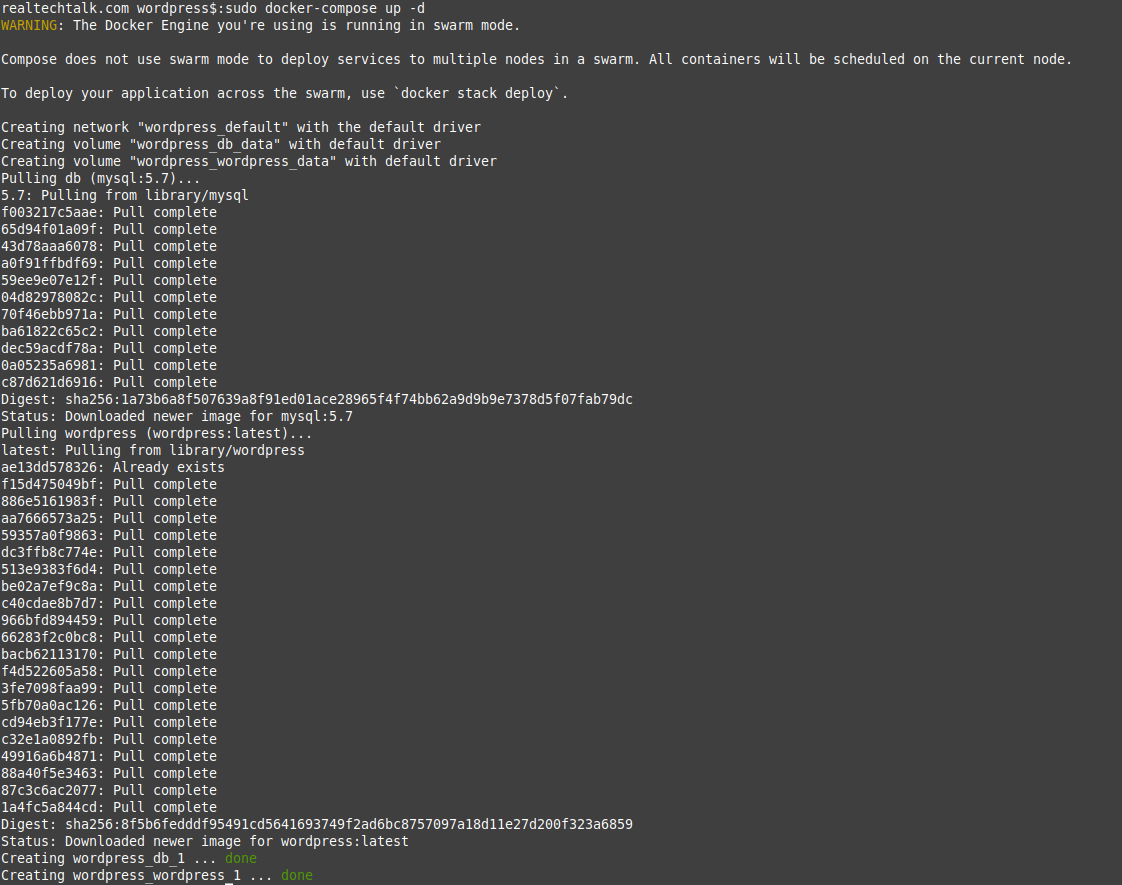
What did it create for containers? It created 2 containers based on the mysql image and Wordpress image as we can see from "docker ps"
realtechtalk.com wordpress$:sudo docker ps

CONTAINER ID   IMAGE              COMMAND                  CREATED          STATUS          PORTS                                   NAMES

0c270fc2ae6f   wordpress:latest   "docker-entrypoint.s…"   5 minutes ago    Up 5 minutes    0.0.0.0:7000->80/tcp, :::7000->80/tcp   wordpress_wordpress_1

d5705b12c19d   mysql:5.7          "docker-entrypoint.s…"   5 minutes ago    Up 5 minutes    3306/tcp, 33060/tcp                     wordpress_db_1
Let's see if it works on our exposed port 7000:
Handy Docker Bash Scripts:
Delete All Images on your node:
for imagedel in `sudo docker images|awk '{print $3}'`; do sudo docker image rm $imagedel; done
*Add -f to rm if you want to force remove images that are being used
Delete all running containers:
for imagedel in `sudo docker ps|awk '{print $1}'`; do sudo docker rm $imagedel; done
*Add -f to rm if you want to force remove containers that are being used
References:
Docker Documentation: https://docs.docker.com/
Tags:
docker, platform, tutorial, howto, install, container, images, monitoring, hosting, providerdocker, quot, developers, conquering, complexity, app, https, github, businesses, efficiently, software, applications, virtualization, layer, eg, virtuozzo, openvz, efficient, ve, vps, server, os, linux, kernel, operating, ips, login, configure, limitations, abstraction, refer, virtual, ves, namespaces, feature, streamlined, automated, namely, utilities, relying, relies, nginx, apache, unrelated, effectively, overhead, method, additional, vpss, debian, infrastructure, installs, unnecessary, multiple, containers, achieve, additonal, ram, cpu, cycles, logging, journalling, processes, default, solutions, providers, caas, maintaining, configuring, developing, preconfigured, users, provider, swarm, cluster, balancing, blend, redundancy, servers, dozens, consistent, semi, dedicated, networking, largely, minimal, ubuntu, asterisk, maintained, automate, ansible, compose, manual, vm, vms, vs, httpd, lightweight, mb, usage, haven, tracked, currently, disk, adds, computing, doesn, mitigate, ksm, efficiency, modifies, isolation, optimized, generally, smalelr, defaults, builds, aim, virtualize, aims, binaries, deploy, purposes, mysql, postgresql, etc, hub, vmware, underlying, mode, clustered, balanced, enabled, allows, decentralized, scaling, adding, removing, tasks, specify, assigning, dns, auto, abiliity, incrementally, updates, reconcillation, replicas, respawn, workers, docs, described, previous, sections, enables, functionality, various, provides, kubernetes, examples, automatically, properties, suited, projects, accessing, shines, deployed, simplicity, features, benefits, outsource, mint, bin, apt, binary, commands, cheatsheet, ps, ports, dc, bash, realtechtalkdebiantest, fa, centos, exited, realtechtalkcentos, flags, filter, output, provided, format, template, int, includes, trunc, truncate, display, numeric, ids, sizes, lists, containerid, restart, delete, rm, attach, ls, dev, lib, mnt, opt, proc, sbin, srv, sys, tmp, usr, var, repository, cba, input, streams, dockerfile, cp, folders, filesystem, diff, inspect, directories, exec, export, tar, archive, import, contents, tarball, info, objects, stdin, registry, logout, logs, fetch, pause, mappings, mapping, rename, rmi, streamed, stdout, stats, stream, resource, statistics, target_image, refers, source_image, unpause, update, configuration, codes, download, digest, sha, ae, bafbb, caab, fd, eb, downloaded, newer, didn, versions, ca, fe, cdd, specifies, illustrate, tags, user, realtechtalkdockerimage, interactive, allocate, pseudo, tty, pulls, creates, shortcut, offers, custom, ip, stderr, blkio, uint, io, relative, disable, capabilities, cgroup, optional, cidfile, cfs, scheduler, quota, rt, microseconds, runtime, shares, cpus, decimal, cpuset, execution, mems, detach, override, sequence, detaching, devices, bps, bytes, iops, content, verification, domains, entrypoint, overwrite, env, variables, groups, cmd, interval, duration, retries, consecutive, failures, unhealthy, initialize, countdown, timeout, maximum, hostname, init, forwards, signals, reaps, ipv, db, ipc, label, meta, delimited, labels, addresses, swap, enable, unlimited, swappiness, mount, assign, alias, scoped, healthcheck, specified, oom, adj, preferences, pid, namespace, pids, privileged, extended, privileges, publish, exits, shm, sig, proxy, sigterm, sysctl, tmpfs, directory, ulimit, username, uid, userns, uts, volume, bind, volumes, workdir, manually, ot, meaningful, retrieve, unable, locally, adff, cf, daa, ce, ff, cbf, prompt, uptime, chrooted, items, df, avail, mounted, overlay, fs, vda, hosts, acpi, firmware, heavily, stripped, hs, task, fdinfo, pretty_name, gnu, bullseye, version_id, version_codename, home_url, www, org, support_url, bug_report_url, cbbbab, dfb, bbdee, bd, isolated, rttapachetest, bf, bcf, extracting, bb, dec, bc, dd, reliably, determine, domain, servername, directive, globally, suppress, mar, mpm_event, tid, unix, configured, resuming, operations, foreground, ctrl, reattach, sigwinch, shutting, gracefully, attaching, console, creating, testagain, dp, detached, mapped, responding, browser, modify, existing, index, html, filestructure, grep, htdocs, pwd, ecdafe, destination, refresh, exposing, lan, follows, essentially, nat, accessible, listens, realtechtalkoops, ef, fad, eefc, daemon, programming, external, connectivity, endpoint, bebce, fc, cb, allocated, internally, unused, anothertestagain, fdd, ebb, forwarding, openvpn, tcp, ea, infallible_khayyam, rttapache, fce, abc, aaf, attempting, removal, easiest, reinventing, customize, deployable, realtechtalk_httpd_tag_ondemand, ee, rttmodifiedtest, aff, clustering, references, documentation,