
Juniper JunOS Command Overview and Howtos Switch, Router, Firewall Tutorial Guide
Enable "cli" mode equivalent in JunOS
cli
Configure Mode
configure
So rather than going to the console on a Cisco switch and typing "enable" and then "conf t", the equivalent in JunOS is "cli" and "configure".
How Do You Apply Changes You've Made?
You can make all kinds of changes to the switch, but remember they are not actually active until you run the "commit" command. This means adding or deleting config options will not have any effect until you run "commit".
Under configure mode:
root# commit

commit complete
How To Set The Hostname:
set system host-name realtechtalk.com
Then commit the changes and the shell will now have your hostname.
Reboot:
request system reboot
Reboot the system ? [yes,no] (no) yes
Shutdown NOW!
[pid 59765]
How Can You Get Info About the Hardware /model/serial number?
In CLI mode:
show chassis hardware
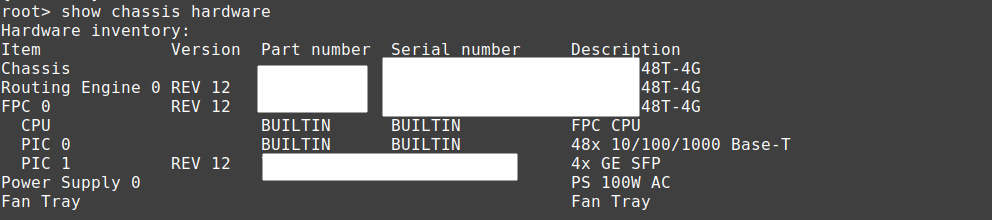
It will also show any SFP/SFP+/QSFP/QSFP+/SFP28/QSFP28 etc.. transceivers plugged in.
Check SFP Module Temperature/Stats
show interfaces diagnostics optics
#note you can specify a specific port after "optics" if you want just one port, otherwise it shows all ports.
Set Default Config:
load factory-default

warning: activating factory configuration
#if you already have DHCP on the network, I recommend deleting the DHCP service which may start handing out IPs by default
delete system services dhcp
#in most firmware you'll need to set a root password before you can commit
How can we use Juniper/JunOS switches with Cisco CME CUCM CallManager without Option 150?
The following configuration can be used to achieve this requirement:
set system services dhcp pool 20.1.20.0/24 boot-file test.cnf // option 67
set system services dhcp pool 20.1.20.0/24 next-server 20.1.1.25 // option 66
DHCP Server/Pool Creation
This creates a DHCP Pool for the 20.1.20.0 subnet, however it does nothing unless you actually have an interface assigned with an iP from that subnet.
Remember that this will not work for any vlan, including the default vlan 0, unless you have set an IP for the VLAN in the same subnet. Eg. below we set the pool to 20.1.20.0/24 so whatever vlan needs this range, needs to have an IP set in that range (it's how we associate a pool with a VLAN).
set system services dhcp pool 20.1.20.0/24
Restrict IP range that is given out
Let's say we want to reserve 20.1.20.200 and up for static IPs we can do this:
set system services dhcp pool 20.1.20.0/24 address-range low 20.1.20.200 high 20.1.20.254
We still probably want things like gateway and DNS for our DHCP:
Here we use evil Google's free but tapped 8.8.8.8 nameserver as an example (run the command again to add more DNS servers).
set system services dhcp pool 20.1.20.0/24 name-server 8.8.8.8
Set DHCP Gateway to be 20.1.20.1
set system services dhcp pool 20.1.20.0/24 router 20.1.20.1
Check DHCP Binding/Client info:
In CLI mode:
show system services dhcp binding
It should show a list of fields like this:
IP address Hardware address Type Lease expires at
Remember that nothing will work still, unless we set a default l3-interface for the VLAN we are setting an IP on.
set vlans default l3-interface vlan.0
Of course if we had a different VLAN named "MYVLAN" with id 777 and wanted to route it out of that interface, then we would change to this:
set vlans MYVLAN l3-interface vlan.777
Setting IPs
If it's not the case you can set DHCP client for vlan 0 or whatever VLAN like this:
set interfaces vlan.0 family inet dhcp
Set Static IP:
This sets the vlan 0 (unit 0) IP to 10.10.20.1 with a subnet mask of 255.255.255.0 (/24).
A common mistake is that sometimes people put a /32 which breaks things, especially DHCP.
set interfaces vlan unit 0 family inet address 10.10.20.1/24
If using a static IP you can set a static route for default gateway like this:
This assumes your default gateway is 192.168.1.1
set routing-options static route 0.0.0.0 next-hop 192.168.1.1
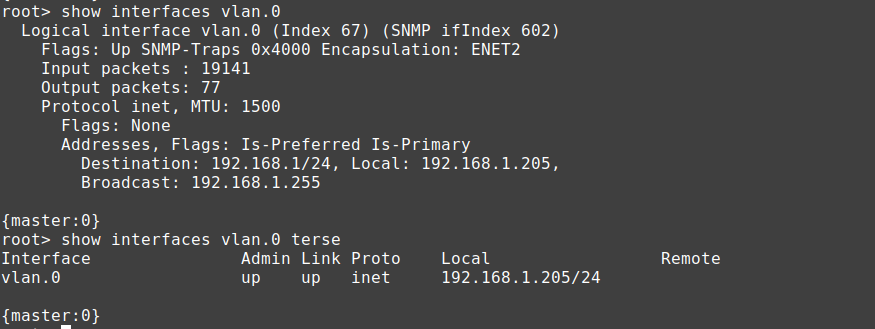
Find the IP
By default most JunOS devices will try to get a DHCP address from the network on vlan 0.
In CLI mode type this:
show interfaces vlan.0
Set Root Password
root# set system root-authentication plain-text-password

New password:

Retype new password:
Enable SSH access:
In conf mode:
set system services ssh
SSH to the device doesn't work as root by default, you should create a separate user. It doesn't allow the user to attempt password authentication.
Received disconnect from 192.168.1.205 port 22:2: Too many authentication failures for root

Disconnected from 192.168.1.205 port 22
If it still doesn't work, you may need to manually recreate the server rsa and dsa keys
ssh-keygen -t rsa -f /etc/ssh/ssh_host_rsa_key
ssh-keygen -t dsa -f /etc/ssh/ssh_host_dsa_key
This will fix the root access by password (which should only be done for testing/non-production!)
set system services ssh root-login allow
How To Disable STP (RSTP):
RSTP is normally enabled by default to avoid loops, however, if the switch may be connected to other uplinks that will disable the port for sending BPDU packets, it may be wise to disable RSTP in this circumstance in conf mode:
delete protocols rstp
See what protocols are enabled on the switch:
show protocols
protocols {
igmp-snooping {
vlan all;
}
rstp;
lldp {
interface all;
}
lldp-med {
interface all;
}
}
How To Check Logs:
In cli mode:
show log ?
authd_libstats Size: 0, Last changed: Nov 17 21:43:30
authd_profilelib Size: 0, Last changed: Nov 17 21:43:30
authd_sdb.log Size: 0, Last changed: Nov 17 21:43:30
chassisd Size: 350470, Last changed: Nov 18 01:06:32
cosd Size: 64148, Last changed: Nov 17 22:00:19
dcd Size: 339433, Last changed: Nov 18 01:42:56
default-log-messages Size: 0, Last changed: Nov 18 01:14:51
dfwc Size: 0, Last changed: Nov 17 21:43:14
dhcp_logfile Size: 60198, Last changed: Nov 18 01:43:03
dhcp_logfile.0.gz Size: 8135, Last changed: Nov 18 01:35:31
dhcp_logfile.1.gz Size: 7401, Last changed: Nov 18 01:18:27
eccd Size: 0, Last changed: Nov 17 21:43:12
erp-default Size: 100197, Last changed: Nov 18 01:41:26
ext/ Last changed: Nov 17 21:40:09
flowc/ Last changed: Nov 17 21:40:09
ggsn/ Last changed: Nov 17 21:40:09
gres-tp Size: 8193, Last changed: Nov 17 22:00:19
interactive-commands Size: 48350, Last changed: Nov 18 01:43:03
interactive-commands.0.gz Size: 9672, Last changed: Nov 17 22:30:01
inventory Size: 5266, Last changed: Nov 18 01:05:53
license Size: 0, Last changed: Nov 17 21:44:44
license_subs_trace.log Size: 4354, Last changed: Nov 17 22:01:21
mastership Size: 1014, Last changed: Nov 17 22:00:19
messages Size: 23596, Last changed: Nov 18 01:41:31
messages.0.gz Size: 24441, Last changed: Nov 17 22:00:00
messages.1.gz Size: 22618, Last changed: Nov 17 22:00:00
pgmd Size: 336, Last changed: Nov 17 21:59:04
snapshot Size: 2926, Last changed: Nov 17 21:59:40
user Show recent user logins
wtmp Size: 20772, Last changed: Nov 17 22:11:52
wtmp.0.gz Size: 96, Last changed: Nov 17 21:44:46
show log messages
Work with a range:
With Juniper you need to create a "range" membership list first.
For example below you can use a wildcard on ge-0/0/* or even ge-*/*/* or even ge-0/0/[0-15] etc..
set interfaces interface-range rttall member-range ge-0/0/0 to ge-0/0/15
set interfaces interface-range rttall member ge-0/0/*
Examples of working with the range:
delete interfaces interface-range rtt unit 0
set interfaces interface-range rttall unit 0 family bridge
Backup Firmware:
root@t1test> request system snapshot media internal

error: Cannot snapshot to current boot device
If you just want the factory firmware/settings backed up:
request system snapshot factory slice alternate
If you get that error just put the snapshot on the alternative partition in this case /dev/da0s2a
root@t1test> request system snapshot slice alternate
Formatting alternate root (/dev/da0s2a)...

Copying '/dev/da0s1a' to '/dev/da0s2a' .. (this may take a few minutes)

The following filesystems were archived: /
Mount the backup like this:
mkdir /var/mtp/da0s2a
mount -t ufs /dev/da0s2a /var/tmp/da0s2a/
Check Resource Usage (eg. CPU utilization and RAM utilization)
show chassis routing-engine
Routing Engine status:

  Slot 0:

    Current state                  Master

    DRAM                       512

    Memory utilization          55 percent

    CPU utilization:

      User                       2 percent

      Background                 0 percent

      Kernel                     4 percent

      Interrupt                  0 percent

      Idle                      94 percent

    Model                          EX2200-C-12P-2G, POE

    Serial ID                      GR0215260031

    Start time                     2014-03-13 10:12:08 UTC

    Uptime                         13 days, 15 hours, 55 minutes, 38 seconds

    Last reboot reason             Router rebooted after a normal shutdown.

    Load averages:                 1 minute   5 minute  15 minute

                                       0.00       0.06       0.05
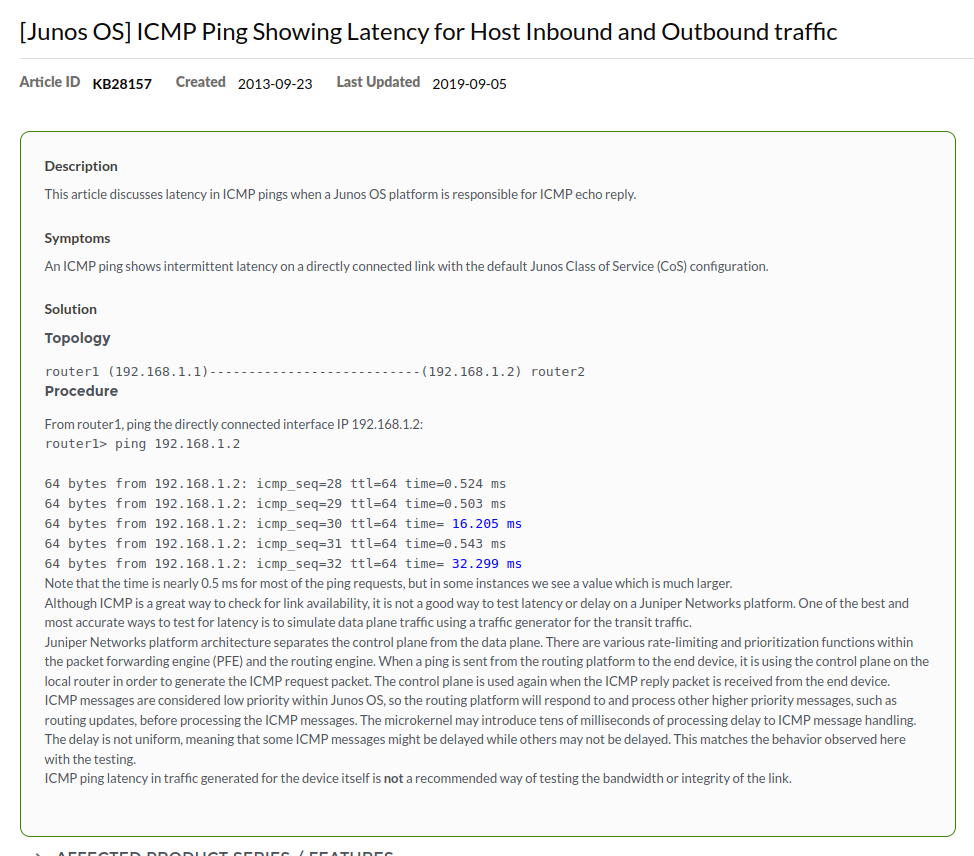
Why does my Juniper JunOS Switch/Router/Firewall Showing High Ping?
You may ping the Juniper device and find even a device on the same physical switch will have higher ping.
Eg. Server 1 on Switch 1 will show ping like this:
64 bytes from 10.20.5.2: icmp_seq=1 ttl=64 time=1.93 ms

64 bytes from 10.20.5.2: icmp_seq=2 ttl=64 time=1.89 ms

64 bytes from 10.20.5.2: icmp_seq=3 ttl=64 time=1.91 ms

64 bytes from 10.20.5.2: icmp_seq=4 ttl=64 time=1.87 ms

64 bytes from 10.20.5.2: icmp_seq=5 ttl=64 time=1.91 ms
But pinging a server on the same switch shows ping like this:
64 bytes from 10.20.5.21: icmp_seq=1 ttl=64 time=0.362 ms
64 bytes from 10.20.5.21: icmp_seq=2 ttl=64 time=0.371 ms
64 bytes from 10.20.5.21: icmp_seq=3 ttl=64 time=0.388 ms
64 bytes from 10.20.5.21: icmp_seq=4 ttl=64 time=0.371 ms
The reason is just because of how JunOS prioritizes ICMP to the RE (Routing Engine) and is normal and does not indicate any impairment to performance. See here: https://supportportal.juniper.net/s/article/Junos-OS-ICMP-Ping-Showing-Latency-for-Host-Inbound-and-Outbound-traffic?language=en_US
Check Firmware/Software Version
show system software detail
Information for jbase:


Comment:

JUNOS Base OS Software Suite [12.3R6.6]
Check Temperature (in CLI mode)
show chassis environment
Class Item                           Status     Measurement

Power FPC 0 Power Supply 0           OK

Temp  FPC 0 GEPHY1                   OK         50 degrees C / 122 degrees F

      FPC 0 GEPHY2                   OK         50 degrees C / 122 degrees F

      FPC 0 GEPHY3                   OK         50 degrees C / 122 degrees F

      FPC 0 GEPHY4                   OK         45 degrees C / 113 degrees F
Change SSH Timeout time:
The default is just 1800 seconds, which means after 30 minutes you will be kicked out of SSH. Let's say you wanto to stay logged in for much longer. Conversely, you can also set it to be much lower.
You an also set "never" as the timeout time.
You just use this command to set the time in seconds for time out.
set applications application junos-ssh inactivity-timeout 4294967295
The number above is the highest value you can set which works out to be about 49710 days!
Show MAC Addresses:
These commands are done from "cli" mode.
show ethernet-switching table brief
On a firewall you would use this to show mac addresses:
show bridge mac-table
MAC flags (S -static MAC, D -dynamic MAC, L -locally learned
           SE -Statistics enabled, NM -Non configured MAC, R -Remote PE MAC)

Routing instance : default-switch
 Bridging domain : rtt138, VLAN : 5
   MAC                 MAC      Logical
   address             flags    interface
   00:24:2c:00:ef:01   D        ge-0/0/1.0
Check system snapshot
show system snapshot media internal

Information for snapshot on       internal (/dev/da0s1a) (primary)

Creation date: Sep 30 18:41:52 2021

JUNOS version on snapshot:

  junos  : 12.1X46-D77.1-domestic

Information for snapshot on       internal (/dev/da0s2a) (backup)

Creation date: Sep 30 22:08:07 2021

JUNOS version on snapshot:

  junos  : 12.1X46-D77.1-domestic
Upgrade Firwmare:
request system software add no-copy /var/tmp/junos-srxsme-15-domestic.tgz
#apply the update by rebooting
request system reboot
How To Set Which Devices can physically use a port
Say you don't want someone plugging in another device to their port, maybe the port the user is plugged into is the company workstation and only the MAC of that workstation should be allowed to use the port. Or maybe it's a VOIP phone and only the MAC of that VOIP phone should have access.
You can use the mac "source-address-filter" option:
edit interfaces ge-0/0/0In the option above we set the interface ge-0/0/0 to only allow the device with MAC "00:21:1e:00:ae:11" to use the port. You could also add more than one MAC address if there are multiple MACs that would be allowed to use the port.
set gigether-options source-address-filter
ge-0/0/0 {
gigether-options {
source-address-filter {
00:21:1e:00:ae:11;
}
}
Port Information
Remember that optical transceivers will appear as the type they are. Eg. if you plugin an SFP transceiver on the SFP+ port, the device will appear as interface ge-0/1/portnumber, or if it were SFP+ as xe-0/1/portnumber
Also remember to set the interface type as either inet for layer 3 routing or ethernet-switching for layer 2.
VLAN Stuff
How to Create a VLAN:
In this example we create a vlan called "rttvlan" with an id of "101"
set vlans rttvlan vlan-id 101
Assign the VLAN called "rttvlan" to port 0
set interfaces ge-0/0/0 unit 0 family ethernet-switching vlan members rttvlan
In this example we assume you have a VLAN ID of 101 and you want to assign it an IP.
If you wanted it to get a DHCP
set interfaces vlan unit 101 family inet dhcp
Or Static
set interfaces vlan unit 101 family inet address 10.10.10.200/24
Now we need to assign an l3 interface to the vlan 101 or it won't work.
set vlans lan l3-interface vlan.101
Set Transparent Mode on Juniper SRX Firewall:
set interfaces interface-range ge0/0/[0-15] unit 0 family bridge
[edit interfaces ge-0/0/12 unit 0 family]
'bridge'
family bridge and rest of the families are mutually exclusive
[edit interfaces ge-0/0/13 unit 0 family]
'bridge'
family bridge and rest of the families are mutually exclusive
[edit interfaces ge-0/0/14 unit 0 family]
'bridge'
family bridge and rest of the families are mutually exclusive
[edit interfaces ge-0/0/15 unit 0 family]
'bridge'
family bridge and rest of the families are mutually exclusive
error: commit failed: (statements constraint check failed)
delete interfaces ge-0/0/0

delete interfaces ge-0/0/1

delete interfaces ge-0/0/2

delete interfaces ge-0/0/3

delete interfaces ge-0/0/4

delete interfaces ge-0/0/5

delete interfaces ge-0/0/6

delete interfaces ge-0/0/7

delete interfaces ge-0/0/8

delete interfaces ge-0/0/9

delete interfaces ge-0/0/10

delete interfaces ge-0/0/11

delete interfaces ge-0/0/12

delete interfaces ge-0/0/13

delete interfaces ge-0/0/14

delete interfaces ge-0/0/15
#after this the interfaces will not be shown under "show"
#delete vlans and all security or it will break things when we try to enable bridging/we have interfaces that are assgined to vlans that no longer exist
delete vlans
delete interfaces vlan
delete security
#now we enable transparent mode by setting the interfaces as family type bridge, we create a vlan for them and associate them with an irb for layer 3 routing
#for now we just add port 0 and 1 to vlan 5 and make those ports transparent
set interfaces ge-0/0/0 unit 0 family bridge interface-mode access vlan-id 5
set interfaces ge-0/0/1 unit 0 family bridge interface-mode access vlan-id 5
#now we have to assign the relevant interfaces to our security zone and allow our security zone to talk to itself (otherwise nothing works as in you can't DHCP from your LAN, you can't ping out or do anything
#in this mode we will be leaving everything open, this is a good way to analyze traffic and slowly restrict unnecessary services and applications for security reasons
#notice we use the same vlan we assigned to ge0/0/0 and ge0/0/1 we also made irb.1 as the interface which we'll have to configure next
set bridge-domains rtt138 domain-type bridge vlan-id 5 routing-interface irb.1
#set the IP on your IRB interface to 10.25.20.200 (change to what suits you)
set interfaces irb unit 1 family inet address 10.25.20.200/24
#after committing and to actually enable transparent mode you must reboot
root# commit

warning: Interfaces are changed from route mode to transparent mode. Please reboot the device or all nodes in the HA cluster!

commit complete
Juniper SRX failure to update firmware:
This normally happens if you go from old firmware on a unit that you have never used. For example JunOS 10, you should upgrade to the latest version of 10, then go to 11, and then go to version 12 etc..
root> ... add no-copy /cf/var/junos-srxsme-12.3X48-D75.4-domestic.tgz
NOTICE: Validating configuration against junos-srxsme-12.3X48-D75.4-domestic.tgz.
NOTICE: Use the 'no-validate' option to skip this if desired.
Formatting alternate root (/dev/da0s2a)...
/dev/da0s2a: 298.0MB (610284 sectors) block size 16384, fragment size 2048
using 4 cylinder groups of 74.50MB, 4768 blks, 9600 inodes.
super-block backups (for fsck -b #) at:
32, 152608, 305184, 457760
** /dev/altroot
FILE SYSTEM CLEAN; SKIPPING CHECKS
clean, 150096 free (24 frags, 18759 blocks, 0.0% fragmentation)
Checking compatibility with configuration
Initializing...
Verified manifest signed by PackageProduction_10_0_0
Verified junos-10.0R3.10-domestic signed by PackageProduction_10_0_0
Using junos-12.3X48-D75.4-domestic from /altroot/cf/packages/install-tmp/junos-12.3X48-D75.4-domestic
Copying package ...
veriexec: cannot update veriexec for /cf/var/validate/chroot/junos/usr/lib/libcurl.so.1: No such file or directory
veriexec: cannot update veriexec for /cf/var/validate/chroot/junos/usr/lib/libcurl.so.1: No such file or directory
veriexec: cannot update veriexec for /cf/var/validate/chroot/junos/usr/lib/libslax.so.3: No such file or directory
veriexec: cannot update veriexec for /cf/var/validate/chroot/junos/usr/lib/libcurl.so.1: No such file or directory
veriexec: cannot update veriexec for /cf/var/validate/chroot/junos/usr/lib/libext_bit.so.3: No such file or directory
veriexec: cannot update veriexec for /cf/var/validate/chroot/junos/usr/lib/libext_curl.so.3: No such file or directory
veriexec: cannot update veriexec for /cf/var/validate/chroot/junos/usr/lib/libext_xutil.so.3: No such file or directory
Verified manifest signed by PackageProductionRSA_2018
Hardware Database regeneration succeeded
Validating against /config/juniper.conf.gz
cp: /cf/var/validate/chroot/var/etc/resolv.conf and /etc/resolv.conf are identical (not copied).
cp: /cf/var/validate/chroot/var/etc/hosts and /etc/hosts are identical (not copied).
Chassis control process:
Chassis control process:
Chassis control process:
Chassis control process:
Connectivity fault management process: rtslib: FATAL ERROR interface version mismatch: kernel=97 library=98,a reboot or software upgrade may be required
Connectivity fault management process:
mgd: error: configuration check-out failed
Validation failed
WARNING: Current configuration not compatible with /altroot/cf/packages/install-tmp/junos-12.3X48-D75.4-domestic
Tags:
juniper, junos, overview, howtos, router, firewall, tutorial, guidehow, ve, active, quot, adding, deleting, config, configure, mode, reboot, shutdown, pid, default, factory, activating, configuration, dhcp, handing, ips, delete, firmware, ll, password, authentication, text, retype, membership, wildcard, ge, etc, interfaces, interface, rttall, examples, rtt, snapshot, settings, slice, alternate, partition, dev, formatting, copying, filesystems, archived, mount, mkdir, var, mtp, ufs, tmp, addresses, commands, cli, ethernet, switching, flags, static, dynamic, locally, se, statistics, enabled, nm, configured, pe, routing, bridging, domain, vlan, ef, primary, creation, sep, domestic, upgrade, firwmare, software, srxsme, tgz, update, rebooting, devices, plugging, user, plugged, workstation, voip, filter, edit, gigether, ae, multiple, macs, transparent, srx, mutually, exclusive, statements, constraint, vlans, enable, assgined, irb, layer, ports, assign, relevant, lan, ping, analyze, restrict, unnecessary, applications, assigned, domains, ip, inet, committing, nodes, cluster, cf, validating, validate, desired, mb, sectors, fragment, cylinder, groups, blks, inodes, backups, fsck, altroot, skipping, frags, fragmentation, compatibility, initializing, verified, manifest, packageproduction_, _, packages, install, veriexec, chroot, usr, lib, libcurl, directory, libslax, libext_bit, libext_curl, libext_xutil, packageproductionrsa_, hardware, database, regeneration, succeeded, conf, gz, cp, resolv, identical, copied, hosts, chassis, chassisd, realtime, ukernel, disable, connectivity, rtslib, fatal, mismatch, kernel, mgd, validation, compatible,